A recent tweak to placement targeting has me completely rethinking my Facebook Promoted Posts strategy. As a result, I wanted to provide some background on how you can do something similar for as little as $1 per day in advertising.
What a Promoted Post Isn’t
When I talk about Promoted Posts, I am not referring to that horrible, awful Boost Post button.
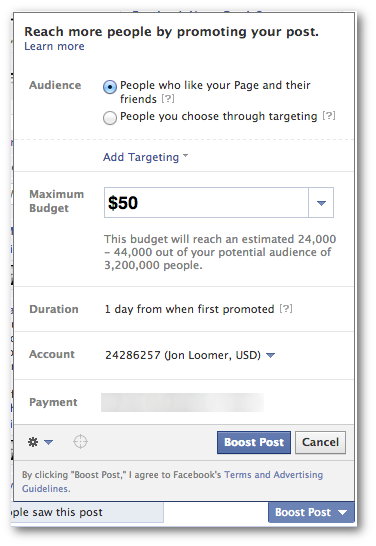
Please, do not use that button! It creates a cookie-cutter campaign that doesn’t allow you to properly focus your audience (Fans only, for example) or determine things like bidding or placement.
What a Promoted Post Is
When I talk about Promoted Posts, I’m referring to the general idea of creating a campaign or ad out of an organic post you have published to your Fans.
You can technically do this within the self-serve ad tool, but I recommend Power Editor because of the significant advantages available when promoting with that tool.
The Goal of a Promoted Post
There are many reasons why you’d want to promote a post. You could, for example, promote a post that is announcing a new product and driving users to a landing page to complete a purchase. This is actually not the main focus of this blog post.
That type of post I’d consider an ongoing campaign. You can run that same campaign for days or weeks. You may want to show related ads to users multiple times in order to get a conversion.
But the problem I’m focusing on today is making sure your Fans, in particular, see your posts.
Yes, somewhere between 10-16% of your Fans will see a given post. You’ll need to pay to reach more of them.
We’re not going to dwell on why that is. My main goal is to reach as many of those Fans as I can with a post that, in most cases, drives users to a blog post I have written.
In this case, my goal is not to reach Fans multiple times. I just want to be sure I reach them once. So I want to keep frequency as close to 1.0 as possible.
Up until now, my focus of such promotion has been entirely on Fans. The reason for this was that I don’t like targeting non-Fans in the News Feed for this type of promotion. And there was not previously a way to target them only in the sidebar.
The Tweak
But Facebook recently changed that! I’m thrilled by this development.
Now when you create an ad in Power Editor, you can choose to target users in the sidebar only (we’ll get to that in a minute!).
Who Should Promote Posts
Anyone can promote posts, but you need to have an allotted budget for it. Your first ad priority should be to increase your number of relevant Fans. Your second should be increasing conversions. If you have budget left over, you should look to promote posts.
This isn’t for everyone, however. Publishers make the most sense because they benefit from any website traffic. This is why I promote posts. I earn direct revenue from traffic.
If you don’t host a blog or you rarely drive traffic to your own website, this strategy may not be for you.
Strategy: Target Fans Only in News Feeds
When I share a new blog post with my Fans, my main goal is to reach as many of them as I possibly can.
First, I’ll try to reach as many of them as I can organically. So this means looking through my Insights to determine the best days and times to post.
I’ll then allow a post to spread on its own organically for four to six hours. After that, it’s time to promote!
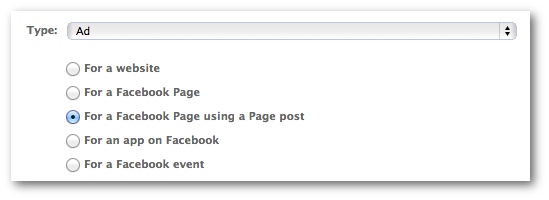
Within Power Editor, I create a campaign and name it [Blog Post Title] – Promoted Post. I then create an ad and name it [Blog Post Title] – Promoted Post – Fans Only – News Feed.
I select “Ad” as the type and then choose “For a Facebook Page using a Page post.”
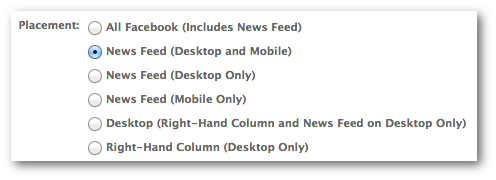
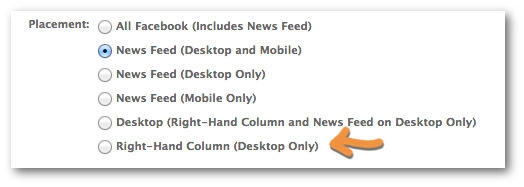
For placement, I select “News Feed (Desktop and Mobile).”
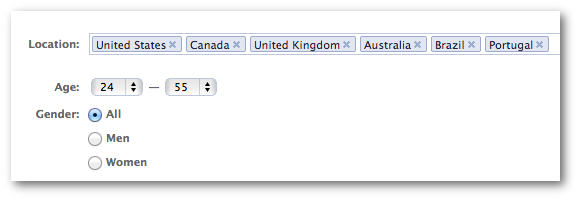
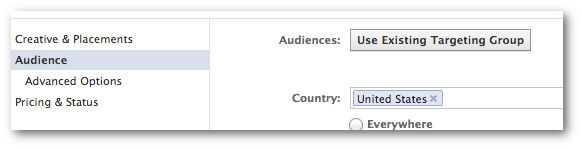
I then make sure to target countries that are most commonly represented by my Fan base. I tend to choose six countries here. I leave gender at “All” and select a relatively wide age target (24-55).
Then leave interests alone and enter the name of your Page under Connections (“Target users who are connected to”).
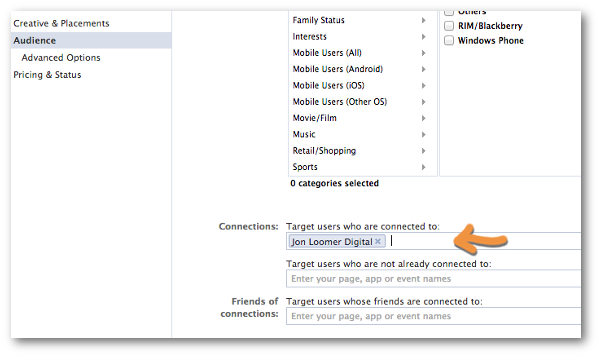
This makes sure that your ad reaches Fans only.
Within “Pricing & Status” make sure that your ad is optimized for the proper action.
For my blog posts, I want to be sure it’s optimized for link clicks since I want to drive traffic to my website.
Strategy: Target Non-Fans Only in the Sidebar
Now that you’ve created an ad that targets your Fans in the News Feed, it’s time to target non-Fans. As I mentioned, I prefer to only reach non-Fans in the sidebar.
Highlight the prior ad that you created and click “Duplicate.”

This will create another ad that looks exactly like the first one as a starting point.
Change the name of this ad to [Blog Post Title] – Promoted Post – Non-Fans – Sidebar. You could add other details here as well if you are doing any specific interest targeting.
This time, you’ll want to make sure placement is set to “Right-Hand Column (Desktop Only).”
Of course, this depends on your comfort level targeting non-Fans in the News Feed. But it’s the approach that I take.
Then set up your demographic and interest targeting. Personally, I’ve created a Saved Audience specifically for non-Fans. This way I can easily set up my targeting with one click, pulling in things like country, age, gender, Precise Interests, Custom Audiences and more.
The thought here is to target people as similar to your current Fans as possible.
Now make sure to enter your Page name within Connections under “Target users who are not already connected to” so that you reach non-Fans only.
You could also duplicate this ad to create one more variation that targets friends of Fans only. The only change you would make is within Connections. Here, make sure to also enter your Page name in the “Target users whose friends are connected to” field.
Strategy: Budget and Frequency
So, how much should you spend? It depends. My main goal is to have a frequency of right around 1.0. In a perfect world, it’s no more than that. I only want to reach each user once.
Make sure to run test campaigns and monitor this within your Ads Manager or the new ad reports. There is a metric there for Frequency.
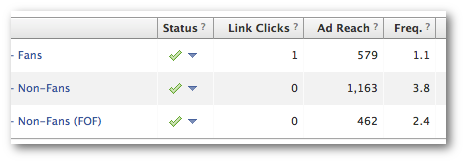
So the proper budget should be whatever it will cost to keep a frequency at about 1.0 — particularly for Fans. I can tell you that I am currently spending about $1 per day to get that frequency. So if your audience is much smaller than mine, you will either likely have a frequency greater than 1.0 or you should look to expand your non-Fan audience.
The main point here is that it’s easy to make an impact with a very low budget. You don’t need to spend a fortune, which is what Facebook seems to want you to do by using the ineffective Boost Post product.


