Facebook Promoted Posts make reaching a larger audience — or more of your current audience — painless and simple.
But that simplicity comes at a cost: Control.
When you promote a post on Facebook, you have minimal control over your bid type, budget, promotion period and interest targeting. It’s a cookie cutter solution that only allows you to bid with Optimized CPM, giving you a handful of budget options for a campaign that will run for up to three days.
As great as these ads are, I want more control. I want to create multiple targeting options of my ad to see what is most efficient. Sometimes the audience I want to reach with my organic post isn’t the same as the audience I’m willing to pay to reach.
I often have people ask me how to edit Facebook Promoted Posts. You can’t.
The purpose of this post is to step you through exactly how you’d recreate a Promoted Post in Power Editor to give you the control that you need.
Understanding a Promoted Post
Before I explain how to do this, you need to understand why it’s possible. When you click the “Promote” button, Facebook generates two (or three, if you target friends of Fans) ads:
- Page Post Ad targeted at Fans that goes into desktop and mobile News Feed
- Page Post Ad targeted at friends of Fans that goes into desktop and mobile News Feed*
- Sponsored Story targeted at friends of Fans that goes into desktop and mobile News Feed
* Only if you target friends of Fans
Most marketers don’t understand that this happens when you promote a post. But if you go into your self serve Facebook ad tool, you’ll see this campaign created.
Use Power Editor
I’ll say this until I’m blue in the face: If you want optimal control over your Facebook ads, you must use Power Editor.
Simply go here to use Power Editor. It’s free. If you need help, read this tutorial.
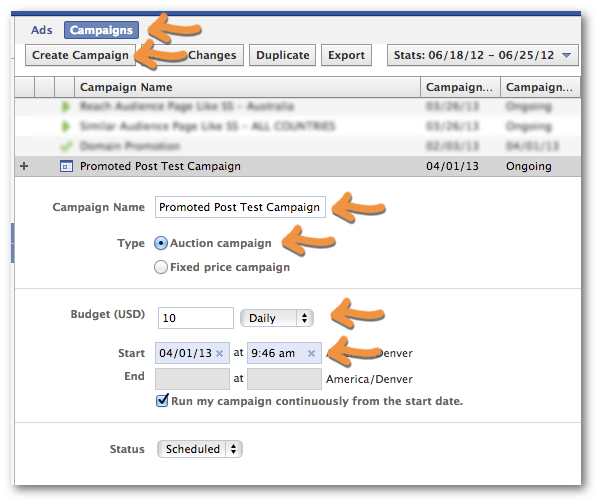
1. Create a Campaign
While in the Campaign view, click Create Campaign. Then do the following:
- Name your campaign
- Pick Auction or Fixed Price (usually stick with Auction)
- Set your Daily or Lifetime budget
- Set the campaign’s start and end date
2. Create Page Post Ad targeted at Fans
Next you want to create the ad that will appear in the News Feeds of Fans.
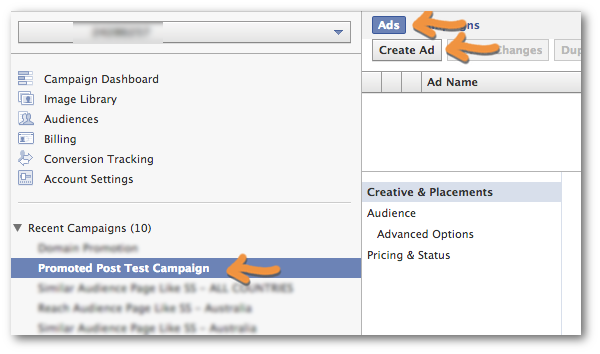
While the campaign you just created is highlighted on the left, click Ads and then Create Ad.
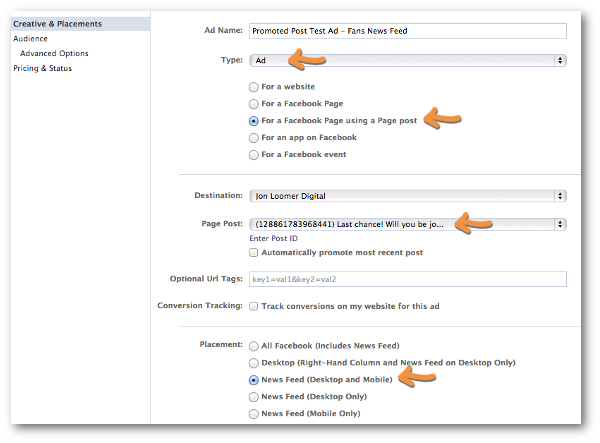
Within “Creative & Placements” make sure that you do the following:
- Select Type: Ad
- Choose “For a Facebook Page using a Page post”
- Select the post you want to promote
- Select placement of News Feed (Desktop and Mobile)
Within “Audience” make sure to enter all of the countries you want to target.

Further down, make sure to enter the name of your Page under “Connections: Target users who are connected to…” This will make sure that your ad only targets your Fans.
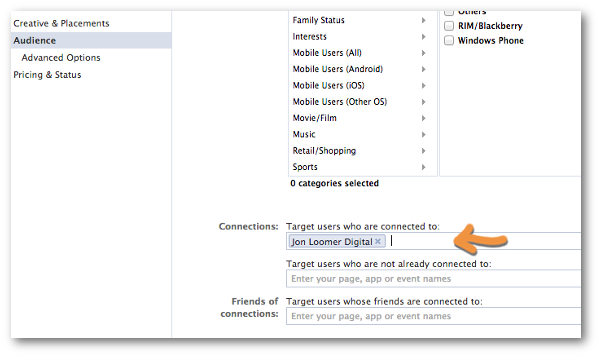
That’s it for this ad. From here, you can customize however you want. I’ll get to that later.
3. Create Page Post Ad targeted at Friends of Fans
I don’t target friends of Fans in News Feed ads, but if you wanted to replicate this portion of the Promoted Post here’s how you’d do it…
Everything you did in #2 is exactly the same except for the “Connections” step. Enter the name of your Page within these two boxes:
- Target users who are not already connected to
- Target users whose friends are connected to
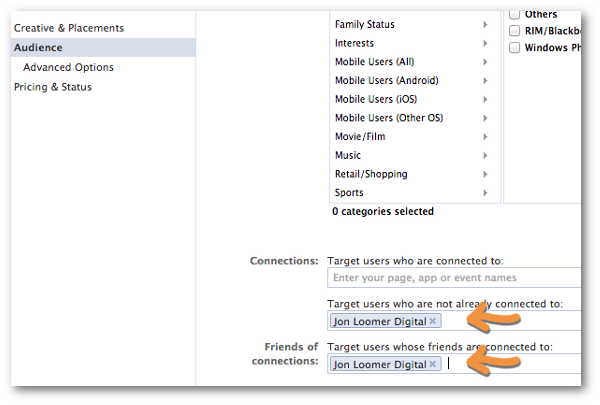
This will then promote your post in the News Feeds (mobile and desktop) of friends of Fans.
As in step #2, feel free to split test!
4. Create the News Feed Sponsored Story
Finally, we need to create the Sponsored Story that goes into the News Feeds of friends of Fans.
When you create a new ad for this campaign, this time you’ll want to do the following:
- Select Type: Sponsored Story
- Choose “About a Page post”
- Choose “People liking a specific Page post”
- Select the post you want to promote
- Select placement of News Feed (Desktop and Mobile)
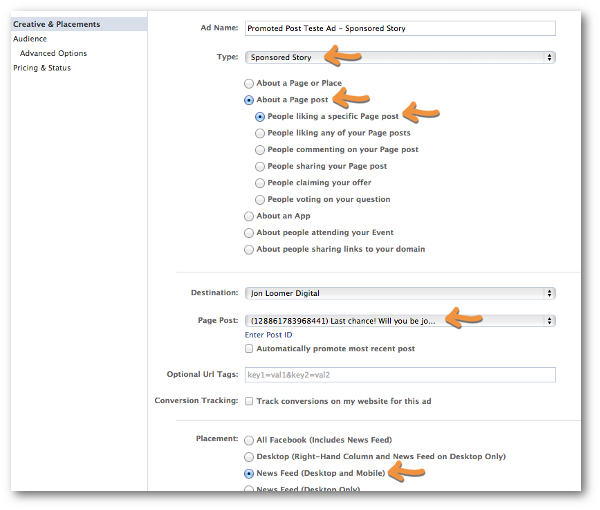
You could also create ads that leverage people commenting on or sharing your Page post.
5. Customize and Split Test
Up until now, all you’ve done is replicate what is done when you click the “Promote” button. You spent a few minutes doing what you could have done in one second.
Of course, that’s not helpful to you. What you want is to now have more control over your campaign.
Within Power Editor, you can now customize just about anything. Here are a few ideas for variations and split testing:
- News Feed: Desktop, Mobile or Both
- Track Conversions: Use for posts that drive users to your website
- Countries: One country at a time or your main countries
- Age: Your target demo
- Sex: Your target demo
- Precise Interests: Focus only on those with certain interests
- Custom Audiences: Target Fans who are also on your email list
- Language: Target only users who speak your language
- Pricing & Status: Options of Optimized CPM, CPM and CPC
The possibilities are endless. Knock yourself out!


