As I speak with Facebook marketers on a daily basis, a common theme arises: They are able to create campaignsThe campaign is the foundation of your Facebook ad. This is where you'll set an advertising objective, which defines what you want your ad to achieve. More that work for a while, but then they suddenly die.
The reason this happens is often quite simple. They are showing the same ad or group of ads to the same people. Eventually, the effectiveness will diminish.
Let’s consider targeting an audienceThis is the group of people who can potentially see your ads. You help influence this by adjusting age, gender, location, detailed targeting (interests and behaviors), custom audiences, and more. More like your Facebook fans as an example…
This audience is somewhat dynamic. Every day, new people are added and people who no longer want to like your page are removed. However, the vast majority of the audience remains the same.
So when you start running the ad, everyone sees it for the first time. If you created a good ad, it works.
But after a few weeks, the bulk of the audience has already seen the ad multiple times. They’ve decided whether they are going to act on it.
That doesn’t necessarily mean that the ad no longer works. It probably remains effective among those new fans who enter your audience (which is a small percentage of your spend). But you can’t expect to convert on those who keep seeing the same ad over and over.
What if we could focus only on the fresh audience? What if we could turn on a campaign and walk away, knowing that it will remain effective over time?
I’m going to step you through a process that you can implement today that will allow you to do just that…
[Tweet “Here’s how to create an evergreen Facebook ad campaign that remains effective…”]
1. The Plan
Let’s discuss a generic scenario that should apply to most online businesses.
1. We have an opt-in or “Step 1” of some sort. Users subscribed to a newsletter, PDF, ebook or other freebie. They may have even bought an entry-level, low-priced product. This process could still apply. However, we’re going to go with the opt-in for this example.
2. We want to present that group with an upsell. We’ll do this through a series of ads to get those subscribers to buy our product.
The impulse would be to immediately start selling to this group. This can work. We could use this process to show that group four different ads over a period of 28 days that focus on four different benefits of the product.
Today, however, I want to take a slightly different approach. I want to look at this more as a nurture campaign that builds slowly to the sale.
In this example, we want to show subscribers a series of seven different ads in 28 days. It would look something like this:
- Days 1-4: Introduce Related Content #1
- Days 5-8: Introduce Related Content #2
- Days 9-12: Introduce Product Overview
- Days 13-16: Introduce Product Benefit #1
- Days 17-20: Introduce Product Benefit #2
- Days 21-24: Introduce Product Benefit #3
- Days 25-28: Introduce Product Benefit #4
The thought here is that after subscribing, we want to send this user into a nurture sequence to eventually get a sale. We want to keep ads fresh, showing users a different ad every four days. And if they don’t convert after 28 days, we want to send them on their way.
As a result, we will always have a fresh group of people coming through the campaign. They will always be seeing their ads for the first time, and for a maximum of four days. These ads, then, will never exhaust their audience.
Keep in mind that you don’t need to follow this process precisely. You can choose fewer ads. You can increase the durations. You can promote different types of content.
Use this as a starting point…
2. Feed Your Funnel
Before I even get to my plan, it’s important that we have people coming into our funnel. Remember that we are targeting people who have registered for something and promoting a related product. But if we’re only generating five registrations per day from which to target, we are wasting our time.
While we won’t get into the details here, consider creating a separate campaign with the sole purpose of driving registrations. This will help build the pool from which we will target below.
3. Create Multiple Website Custom Audiences
Everything I am about to show you is done in Power Editor. If you don’t yet use Power Editor, it’s time to start! Let’s get to it…
When we talk about targeting subscribers, most marketers typically think of targeting email custom audiencesA customer list custom audience is created by uploading a customer list that Facebook matches with users so you can target them with ads. More. But these aren’t particularly dependable for a couple of primary reasons.
First, the email users provide when opting in matches up with a Facebook profile to target about 50% of the time. That leaves out 50% of potential customers!
Second, an email custom audience is static without the help of a third party tool (I use DriftRock Flow). Without that third party tool, you’d need to constantly update the list manually.
In reality, though, we don’t need that list. We just need some very smart Website Custom AudiencesA website custom audience matches people who visit your website with people on Facebook. You can then create ads to show to that audience. More.
Based on our plan above, we know that we want to target people who have subscribed to a particular list during the following time periods:
- Days 1-4
- Days 5-8
- Days 9-12
- Days 13-16
- Days 17-20
- Days 21-24
- Days 25-28
We can do this with Website Custom Audiences.
[If you don’t have the Facebook pixelThe Facebook pixel helps advertisers track events that occur on their website and reach people who performed those events with ads. More on your site, please read this or this first. Then come back to this post!]
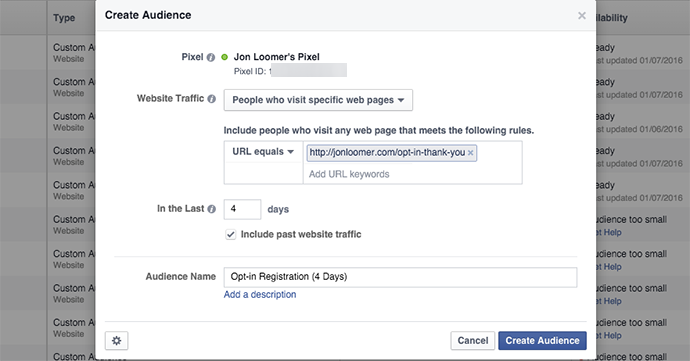
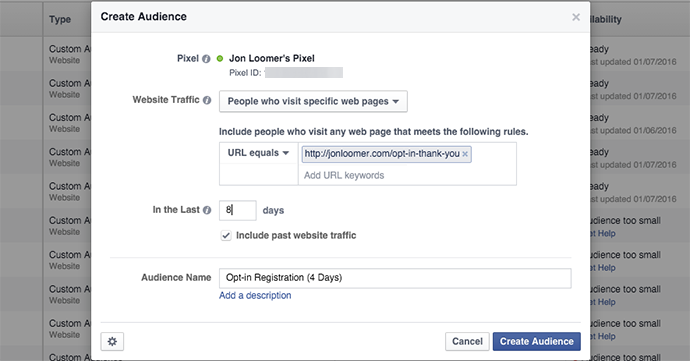
If someone visited the thank you page that is shown after subscribing, we know that person is a registrant. So by creating Website Custom Audiences of those people who have seen that page, we are creating audiences of those who have registered.
We will want to create seven variations of this Website Custom Audience. The WCA for those who subscribed during the past 1-4 days would look something like this…
We will need more, of course. Here is one for 8 days…
We will also need Website Custom Audiences for 12, 16, 20, 24 and 28 days.
I know what you’re thinking: But there will be overlap! Those in the 4 Days WCA will also be in the others! Yes, they are. We’ll handle that later.
In addition to creating WCAs of those who have opted in, we also have to make sure to create one for those who have already bought the product we are looking to sell. There’s no reason to waste our money on them in this nurture sequence if they have already purchased!
It may look like this…
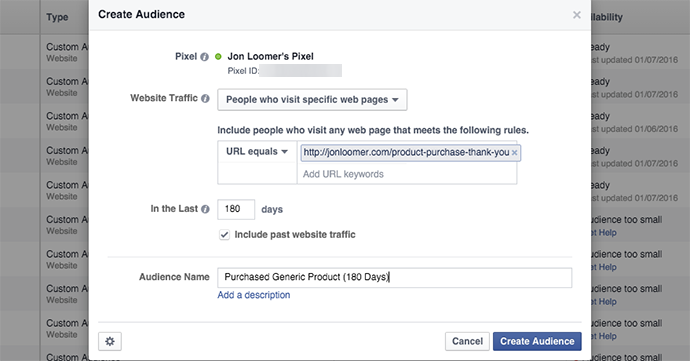
In this case, you’ll notice that I set a duration of 180 days. That is the maximum. The reason is I will want to exclude all of those who purchased, so I want to be sure that duration is as long as possible to catch as many as I can.
You should probably also create an email custom audience of those who have already purchased to cover your bases. While it’s impossible to capture 100% of these people to exclude appropriately, creating both audiences will help you get as close as possible.
Now let’s use these…
4. Create Seven Ad Sets
Before we create our ad setsAn ad set is a Facebook ads grouping where settings like targeting, scheduling, optimization, and placement are determined. More, you’ll of course need to create your campaign. Note that the objective you choose here won’t be all that important due to the bidding we are going to use (we’ll get to that in a minute). So you can use either “Clicks to Website” or “Website ConversionsA conversion is counted whenever a website visitor performs an action that fires a standard event, custom event, or custom conversion. Examples of conversions include purchases, leads, content views, add to cart, and registrations. More,” but it really won’t matter.
Let’s step through creating one of the ad sets. From there, know that the other six will be identical, other than the targeting.
Name Your Ad Set
Don’t get sloppy with this step. Name your ad set something that describes what makes this ad set different. In this case, the only difference will be the target audience.
So for the ad set that will target those who have registered during the past four days, it may be named…
“Opt-in Registration (1-4 Days)”
Set Your BudgetA budget is an amount you're willing to spend on your Facebook campaigns or ad sets on a daily or lifetime basis. More

The budget you set is typically going to depend upon the size of your audience (and of course the amount you’re willing to spend). While the audience is likely to be very small, you can actually set this a little on the high end because you are unlikely to spend the entire budget (that’s because of the bidding we are going to choose).
Set Your Schedule
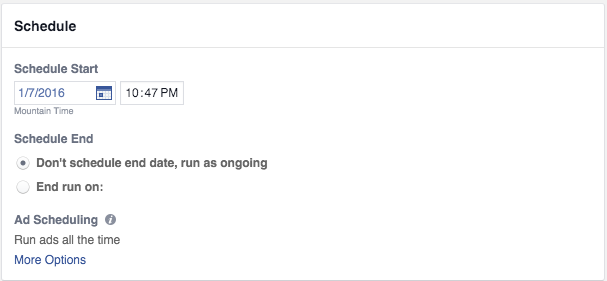
It may be a personal preference, but I like to use daily budgets. It allows me to better adjust on the fly if necessary. Up to you, of course.
While I otherwise always choose an end date, this is one you may keep open-ended. Why? Because it’s evergreen!
That said, feel free to set an end date of a month or two out if you prefer.
Edit Your Audience
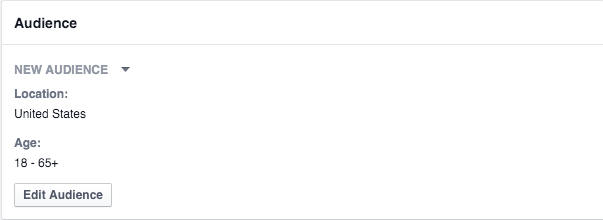
Click the “Edit Audience” button. Then you’ll see this…
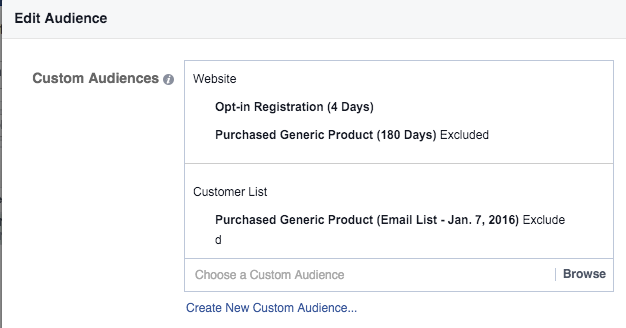
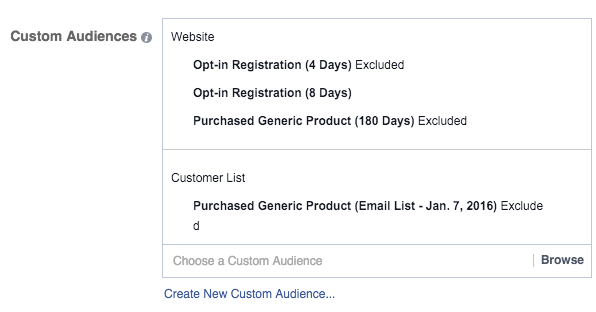
As you can see above, you’ll want to enter the following three custom audiences that we created earlier:
- Opt-in Registration (4 Days)
- Purchased Generic Product (180 Days)
- Purchased Generic Product (email list)
Since we are targeting the people who have registered during the past four days to sell a product, we will target the first audience while excluding the other two (you exclude by clicking the arrow to the right of the audience once selected).
By default, your home country will be selected within this targeting. With custom audiences, you can actually choose to remove this so that you will reachReach measures the number of Accounts Center Accounts (formerly users) that saw your ads at least once. You can have one account reached with multiple impressions. More everyone within that audience, regardless of country.
That, of course, is up to you. If you have found that registrants from certain countries never purchase, you can decide to only select a few primary countries.
Otherwise, there’s no need to touch anything else here. Just save this audience.
Choose Your PlacementA placement is a location where your ad is shown. Examples include Facebook's mobile Feed, Messenger, Instagram feed, Audience Network, right-hand column, and more. More
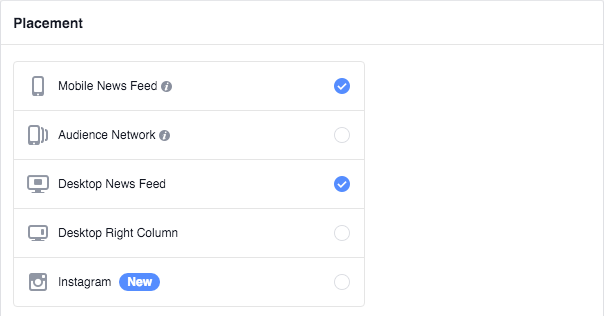
This is again up to you, but I am going to select only Desktop News Feed and Mobile News Feed for a few reasons.
First, I have nothing against Right Column, but we are going to select Daily Unique ReachDaily Unique Reach Facebook ads optimization allows you to limit the number of times you reach your audience to no more than once per day. More bidding (spoiler alert!), and I don’t want to waste our one daily impression in the right column.
Second, in my experience, Audience NetworkAudience Network is a network of mobile apps that have been approved to monetize their apps with ads. This is how you can show your Meta ads to people while they are away from the Meta family of apps. Audience Network and associated groups are among your placement selection options in the ad set. More results in a lot of low quality clicks. I don’t want that.
Third… Instagram? Yeah, you’ll need to be sure that whatever you do is a fit for that platform. But again, keep in mind the bidding we are going to select.
Set OptimizationThe Performance Goal is chosen within the ad set and determines optimization and delivery. How you optimize impacts who sees your ad. Meta will show your ad to people most likely to perform your desired action. More & Pricing
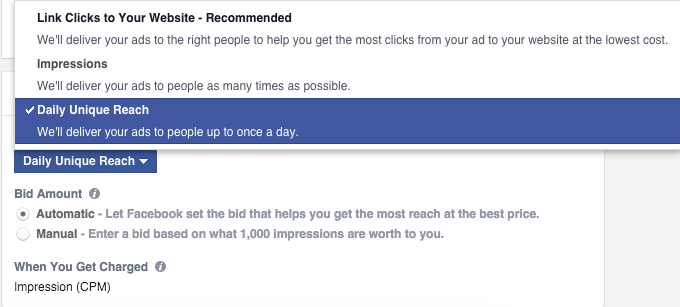
By default, Facebook will want you to optimize for Link ClicksThe link click metric measures all clicks on links that drive users to properties on and off of Facebook. More or Conversions or whatever your campaign objectiveWhen you create a campaign, one of the first things you'll do is select an objective. The campaign objective is your ultimate goal. Your selection will impact options, including optimization and delivery. Options include Awareness, Traffic, Engagement, Leads, App Promotion, and Sales. More is. While that’s typically acceptable — or even preferable — we’re not going to do that in this case.
When optimizing for one of these actions, Facebook will focus on reaching a small percentage of your audience. For example, those most likely to convert.
But understand we are already starting with a very small and relevant audience. We want to reach all of them. We really don’t want Facebook to optimize in this case.
So we instead select Daily Unique Reach. This allows us to show our ad to everyone within that audience, but no more than once per day. This is again why we got rid of the sidebar.
Whether you choose automatic or manual bidding is up to you. To keep it simple, let’s leave it at automatic.
Audience Variations
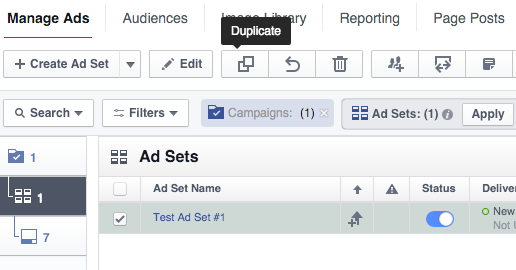
You’ll want to create seven ad sets in all. They will be identical, except for the targeting (and the ad within them, which we’ll create later).
So let’s duplicate that first ad set six times by clicking the “Duplicate” icon at the top.
Make sure you change each of the ad set names to reflect the audience we’ll be targeting. If you forgot, it is something like this…
- Opt-in Registration (1-4 Days)
- Opt-in Registration (5-8 Days)
- Opt-in Registration (9-12 Days)
- Opt-in Registration (13-16 Days)
- Opt-in Registration (17-20 Days)
- Opt-in Registration (21-24 Days)
- Opt-in Registration (25-28 Days)
Then we’ll need to edit the audience. Here is what the audience would look like for the “Opt-in Registration (5-8 Days)” ad set…
By targeting those who registered during the past eight days and excluding those who registered during the past four, we’re able to accomplish our goal of only targeting those who registered during the past 5-8 days. As a result, this will allow us to surface a different ad to people every four days.
You’d do the same thing when editing your audience for 9-12 days. In that case, you’d target anyone who registered during the past 12 days while excluding those who registered during the past eight (and exclude those who purchased the product, of course).
Repeat for all seven ad sets.
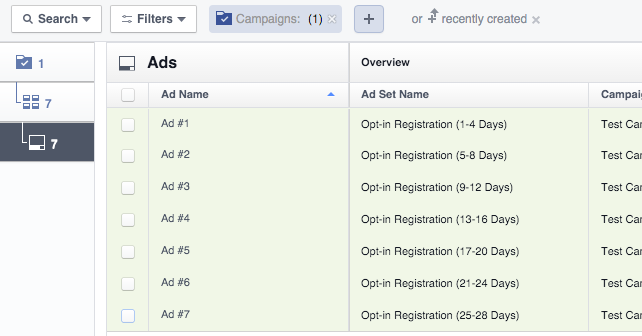
5. Create Seven Ads
Recall our goals here. We want to show a different ad every four days. As a result, we’ll want to create seven different ads and assign each one to a different ad set (one of those seven ad sets created above).
Click the button to create an ad…
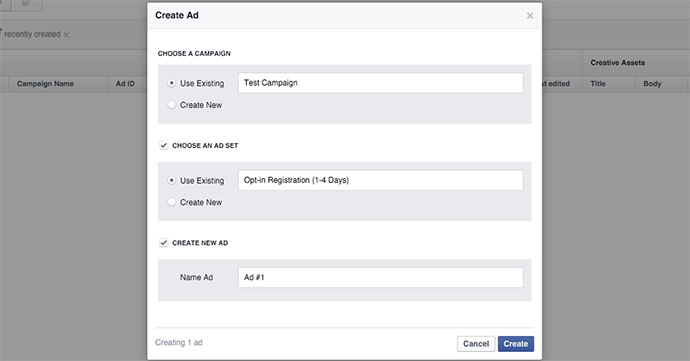
You’ll want to select the current campaign and the appropriate ad set within it. When you’re done, you’ll have seven ads, each within a different ad set.
It might look like this…
I won’t go through the process of creating the ads as this will be completely up to you. But recall my original plan at the top…
- Days 1-4: Introduce Related Content #1
- Days 5-8: Introduce Related Content #2
- Days 9-12: Introduce Product Overview
- Days 13-16: Introduce Product Benefit #1
- Days 17-20: Introduce Product Benefit #2
- Days 21-24: Introduce Product Benefit #3
- Days 25-28: Introduce Product Benefit #4
So our first two ads would promote blog posts that are, ideally, related both to the opt-in and the product we are trying to sell. We’re just engaging our warm audience a bit more on this topic before we go in for the sale.
Then we run an ad providing a general overview of our product. Of course, we can’t cover everything there. So it’s a start.
Finally, we run a series of ads that each highlight a benefit of the product. We could even provide a special discount in one of these ads.
Note that there are unlimited approaches you can take here. You could simply focus only on selling the product, skipping the first two ads. I’ve done that, too!
6. Monitor to Assure Ads Are Effective
Now, we can’t just turn this campaign on, sit back and assume success. You should monitor each ad for performance.
However, keep a few things in mind…
First, if you are going for a sale in all of your ads, expect that the first won’t be as effective. That ad still has a purpose.
Second, you may have different goals for each of your ads. Earlier I suggested promoting related content with your first few ads. In that case, you obviously shouldn’t be concerned about generating sales.
While the inclination will be to split testSplit testing (or A/B testing) allows you to test changes in Facebook variables like ad creative, audience, or placement to determine which approach performs best. More and create multiple ad variations per ad set, that is going to be a bad idea in this situation. Unless you have huge volume, you are simply going to water down your results.
Instead, monitor for a while and make changes where appropriate.
You will also need to customize your ad reports in Ads Manager to include columns for link clicks and conversions, particularly if you promote both blog posts and your product with your ads. If you aren’t sure how to do that, read this!
Your Turn
This is a process you can apply to create your own evergreen Facebook ad campaign to sell a product. Have you ever done anything similar?
Let me know in the comments below!