[AUDIO VERSION: I also recorded an audio version of this blog post. Click below to listen. Let me know if this is something you find helpful!]
If you are running Facebook ads that lead to any sort of conversion, directly or indirectly (sales, lead or opt-in), it’s a must that you use conversion tracking. Google tracking isn’t enough.
But even if you use Facebook conversion tracking, do you know when to use it? Do you know the difference between optimizing for and tracking pixels? Do you know how to set the conversion value? And do you know how to track for multiple conversions?
Answering these questions is precisely the purpose of this blog post.
Why Google Tracking Isn’t Enough
Far too many advertisers think that it’s enough to use Google URL parameters, goals and analytics. It’s not.
When you don’t use Facebook’s conversion tracking, you aren’t optimizing for a conversion. We’ll get to why that matters in a minute.
When you don’t use Facebook’s conversion tracking, you aren’t able to break down Cost Per Conversion based on the following:
- Age
- Gender
- Age & Gender
- Country
- Ad Placement
When you don’t use Facebook’s conversion tracking, you aren’t able to break down cross-device performance. Within the custom Facebook ad reports, you can analyze on which devices users saw your ad and on which devices they converted.
How to Create a Conversion Pixel
Within Ads Manager, click the “Conversion Tracking” link on the left…
Then click the green “Create Pixel” button at the far right…
Next you’ll need to choose a category for the conversion you are looking to get. The options are:
- Checkouts
- Registrations
- Leads
- Key Page Views
- Adds to Cart
- Other Website Conversions
Finally, name your pixel and click the blue “Create Pixel” button…
You will then be given your pixel code…
Copy and place that code between the HEAD tags of the “success” page following a conversion (the “Thank you for your purchase!” page). It’s important this goes on the success page — and the page that only someone who just converted will see. That notifies Facebook that a conversion is complete.
Make sure to refresh the page that has the pixel on it. You should then see that the pixel is active…
Facebook will also begin tracking all times that pixel is fired (typically meaning a conversion, but someone — including you — may refresh it), regardless of whether someone reached that page from an ad.
In the example above, that pixel fired 506 times on September 26. That does not mean, however, that my ads led to 506 conversions on that day. I don’t need to run any ads at all for this to track.
When you run ads and connect a conversion pixel to those ads, Facebook will separate the conversions that happened as a result of someone viewing or clicking your ads.
Setting the Conversion Value
When you create your pixel, you’ll have the option of entering a conversion value. This isn’t required, and that value otherwise defaults to $0.00. But it can be very useful for your reporting!
There are two places where you can enter the value and currency for your conversion…
The value should be the cost of your product. This way, you can easily compare the cost of your advertising to the total value of conversions that resulted from those ads.
Tracking for a Conversion Pixel
You’ve created the pixel, but now it’s time to create a Facebook ad that tracks conversions. How else are you going to measure success?
I strongly encourage you to use Power Editor. The reason for this is going to become clearer in a moment. But trust me on this.
You can track for conversions regardless of your objective. Simply click the “Use Existing Pixels” button when creating your ad…
Note that you could have created a pixel at this step as well, but we already created ours!
Now check the conversion pixel you want to track and click the “Select” button…
Optimizing for a Conversion Pixel
Note that in the example above, you can track conversions no matter your objective. However, keep in mind that if your objective isn’t a Website Conversion, Facebook won’t optimize for that action.
Remember that earlier when you created your pixel, you selected the conversion type. Facebook is then able to see which users convert for which conversion type to help optimize accordingly.
When you choose the Website Conversion objective, you’ll be required to select a conversion pixel twice…
The first button is for choosing the conversion(s) you want to track. The second is for choosing the single conversion you want to optimize for.
Note that the same pixel should be selected for both tracking and optimizing. However, while you can select multiple pixels to track (we’ll get to that in a minute!), you can only optimize for one.
Why You Should Track for Multiple Pixels
If you’re driving website traffic, you should seriously consider tracking for conversions. Even if you aren’t leading to a landing page, you should track for any conversion that leads to that content.
For example, I am writing this post about Power Editor. I also link to my Power Editor ebook (there’s that link!). While getting conversions isn’t my main objective, I should still track for it.
In fact, I should consider tracking Power Editor course sales as well. Not that it’s the focus of this blog post, but because a sales funnel is created for it when someone gets the ebook.
So when you click the button to track conversions, you can actually select multiple pixels…
Note that this is only available within Power Editor. The main ads interface only allows you to track a single pixel per ad.
Using the Facebook Ad Reports
Now you need to analyze the success rate of your advertising. Most people use the main campaign dashboard within Ads Manager. That’s fine, but it’s only scratching the surface!
You need to use the custom Ad Reports. Click on “Reports” on the left within Ads Manager…

The ad reports are EXTREMELY valuable. You need to use them! But the default view is pretty worthless. Click the “Edit Columns” button to get access to your gold.
Select whatever columns are important to your report. Make sure you read this post for more info on that.
Since this is a conversion report, you’ll want to select the appropriate conversions within “Actions”…
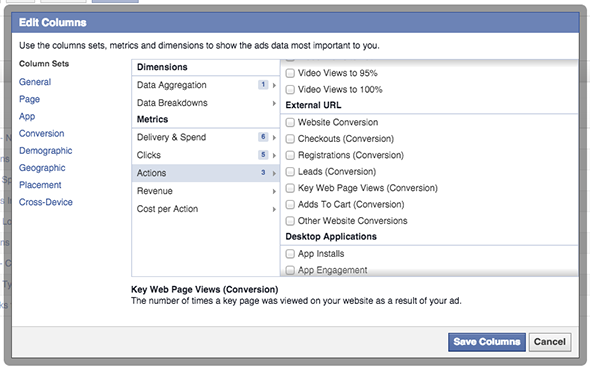
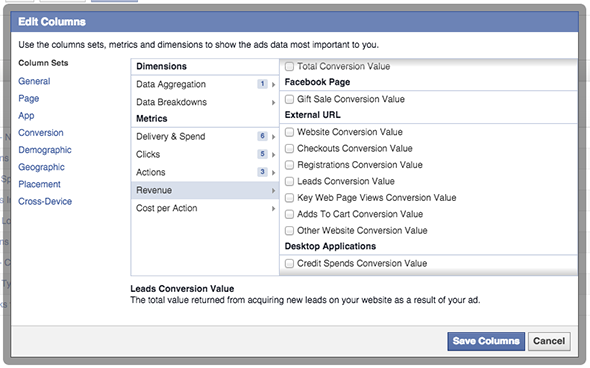
To add columns for value of your conversions, select the appropriate conversions within “Value”…
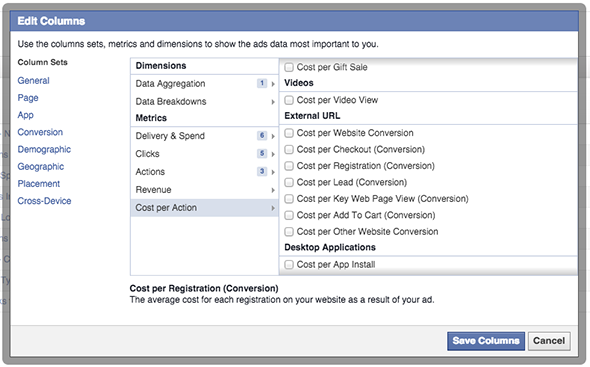
And finally, select the appropriate conversion types under “Cost Per Action”…
This will give you a great base report that will show you the number of conversions, total conversion value and cost per conversion for your advertising. But recall that you can also break down performance by things like age, gender, country and placement.
You do that within “Data Breakdowns”…

Some Tips on Tracking for Multiple Pixels
These new reports will be great for breaking down the number of conversions, value of your conversions and the cost per conversion that resulted from your advertising. But you lose some granularity if you track for multiple conversions.
In the earlier example, I tracked opt-ins for my ebook as well as purchases of my Power Editor course. I tracked multiple pixels for conversion since I have different packages that can be purchased.
While I can view total number of conversions, total conversion value and total cost per conversion, it’s not as easy to break this down by product. Instead, Facebook lumps it together.
One way around this is through conversion types. Since I was tracking my ebook opt-ins (Leads) and sales (Checkouts), I can create columns for each of those conversion types (number, value and cost per conversion for each). However, Facebook lumps together all conversions that are of the same type.
Personally, I’m okay with this. But if you really want to isolate what product someone bought and you’re tracking for multiple conversions, consider using different tracking pixel types.
For example, if you’re tracking sales of three different products, consider using the following conversion types:
- Adds to Cart
- Checkouts
- Other Website Conversions
Of course, you should still optimize for the checkout.
Learn More Benefits of Power Editor
Tracking for multiple conversions is just one of the reasons you should be using Power Editor. The rest can be found in my ebook, “The 9 Ways the Pros Are Benefitting from Power Editor — AND YOU AREN’T!”


