Any screenshots and details of functionality may no longer be relevant. Below are some related posts that are more current:
- Advantage Changes to Advantage+ (Jul 6, 2025)
- How to Approach Meta Ads Targeting Now: A Detailed Guide (Jun 30, 2025)
- Advantage+ Campaign Creation: A Complete Guide (Jun 23, 2025)
You’re an advanced Facebook marketer, so you use Power Editor to create your ads. And as an advanced Facebook marketer, you know the importance of proper targeting.
Of course, proper targeting often means entering in countless precise interests, Custom Audiences, Lookalike Audiences and other variables to reach your ideal audience. It can take a ton of time.
Up until now, you could create a Saved Target Group (also called a Saved Audience). This is a great way to save time when building your ads.
The only problem, however, was that you needed to build this audience from scratch. Even if you had created ads that previously used the targeting you want to utilize going forward.
That’s finally changed. Facebook now allows you to create an audience using an ad you’ve already created.
Today we’re going to focus on the following:
- Why you should create Saved Target Groups
- Types of Saved Target Groups you should create
- How to create a Saved Target Group using a previous ad
The first two steps are to get you up to speed if you’ve never created these before. The third covers the new functionality that is going to make our lives a whole lot easier!
Why You Should Create Saved Target Groups
When you create an ad in Power Editor, you could enter in all of this information manually:
- Location
- Age
- Gender
- Precise Interests/Broad Categories
- Partner Categories
- Connections
- Custom Audiences (includes Lookalike Audiences)
- Excluded Audiences
- Interested In
- Relationship Status
- Languages
- Education
- Workplaces
That’s a ton of information, and it’s a major hassle if you create a lot of ads that utilize significant targeting (and you should).
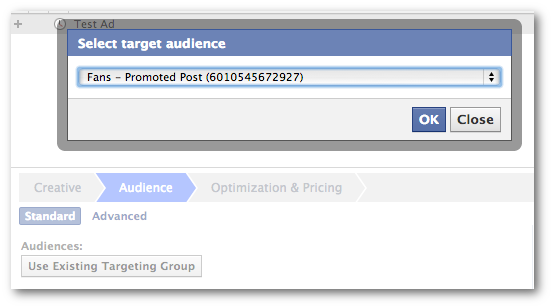
But luckily when you create an ad, you can click the “Use Existing Targeting Group” button during the Audience step to automatically prefill this for you.
If you’ve never created a Saved Target Group before, you can go ahead and read this tutorial. Or you can continue reading for a new shortcut.
Types of Saved Target Groups You Should Create
You should sit down and think about the various groups you target in your ads. Make a list.
For me, there are a few groups I target regularly:
- Fans with age/location targeting
- Users who like similar Pages and interests
- Users on Custom Audience lists
- Users on Lookalike Audience lists (Reach)
- Users on Lookalike Audience lists (Similarity)
- Lookalike Audience (Reach) + similar Pages & interests
- Lookalike Audience (Similarity) + similar Pages & interests
[Note: Read this post for more information on some of the groups I target.]
I save all of these for easy access. You don’t need to create the same audiences since your saved target groups will depend on your needs. But you should put in the time to figure this out.
How to Create a Saved Target Group Using a Previous Ad
Okay, so now the new functionality that will make your life a whole lot easier.
I’m going to assume that you’ve previously created a bunch of ads that targeted your preferred audience. You can now use those ads to automatically generate new saved target groups.
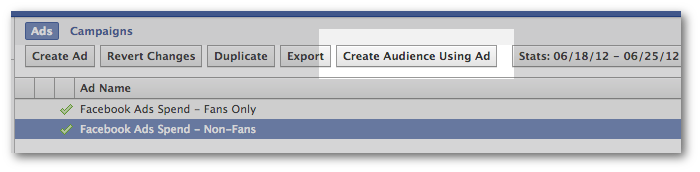
First, find the ad that targeted that preferred audience that you’ll want to target again later.
Then click the “Create Audience Using Ad” button at the top.
You’ll then be redirected to the saved target group creation process within Audiences. The saved target group will be prefilled based on the targeting of the ad you were using. The name of that ad will be, by default, the name of that ad.
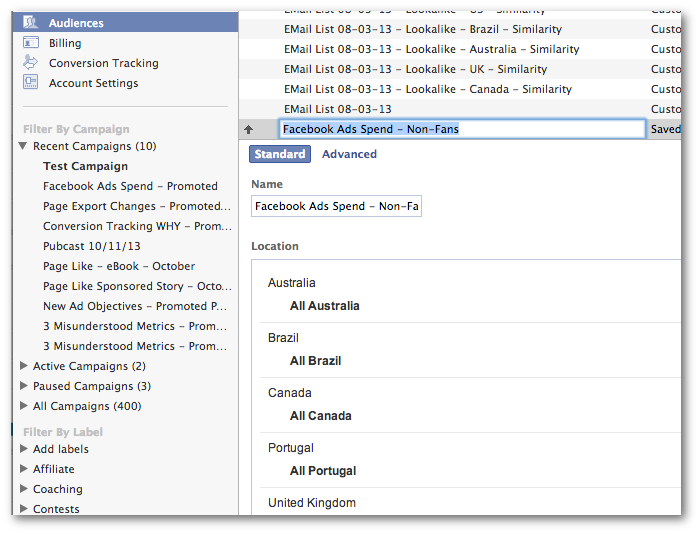
You should now change the name of that saved target group to accurately reflect the audience you are targeting for easy reference later.
Easy enough, right?