You’re finished creating your first Facebook campaign in Power Editor. But there’s nothing to run until you create an ad.
Want to create one?
Ready? Let’s go!
What You Are Going to Learn Today
Today’s lesson is Creative & Placement. We’re going to focus on the following:
- How to Create an Ad
- Naming Your Ad
- Picking an Ad Type
- Ad Destinations
- URL Tags
- Conversion Tracking
- Placement
This lesson will not focus on the details of ad types, URL Tags, Conversion Tracking or Placement. It’s merely an overview. We’ll dig into each of those within Sections 3 and 4.
The Lesson
It’s time to create your first ad! This is going to be very surface level for now. I just want you to have a basic understanding of these things. We’ll dig in much more later, particularly on the topics of ad types, Conversion Tracking and placement.
How to Create an Ad
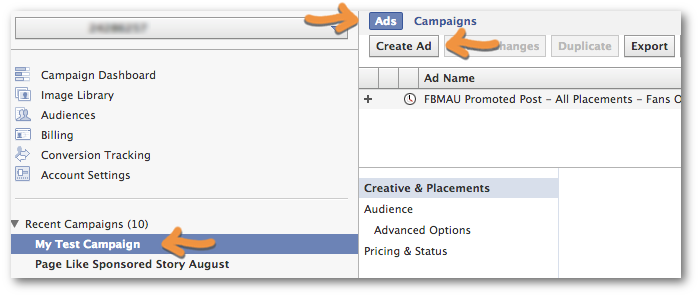
Using the test campaign you created, highlight it on the left. Then click Ads at the top, followed by the “Create Ad” button.
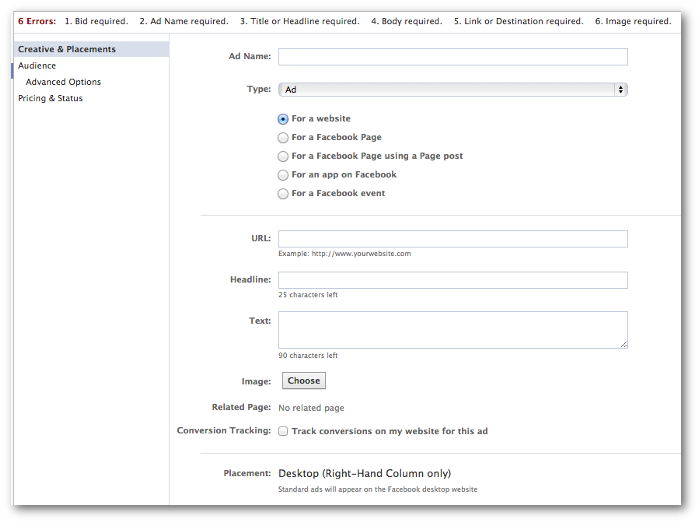
You now have a blank canvas that looks like this:
Naming Your Ad
Naming your ad is a very important step. You are going to create many, many different ads. And you’ll even create multiple ads within the same campaign. So you’ll need to make sure that you can quickly determine what an ad is doing simply by looking at its name.
Here’s a naming convention that I like to use:
Base Name – Placement – Targeting – Bidding
So an example of this would be:
FBMAU Promoted Post – All Placements – Fans Only – oCPM Link Clicks

Picking an Ad Type
I’ll spend a lot more time on this later. But I want to give you a general idea of what is here.
Within the “Type” drop-down are four different options.
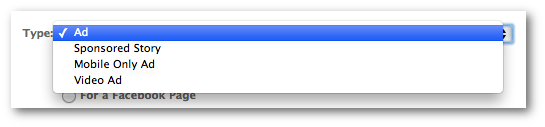
The only two you really need to focus on are Ad and Sponsored Story. The other two (Mobile Only Ad and Video Ad) can be created with the first two options.
There are five variations under the generic “Ad” option:
- For a website: Not connected to a Page; drive traffic to your site.
- For a Facebook Page: Get Likes for your Page.
- For a Facebook Page using a Page post: Promote a post.
- For an app on Facebook: Get installs of your app.
- For a Facebook event: Get RSVPs for your event.
There are many variations under Sponsored Story.
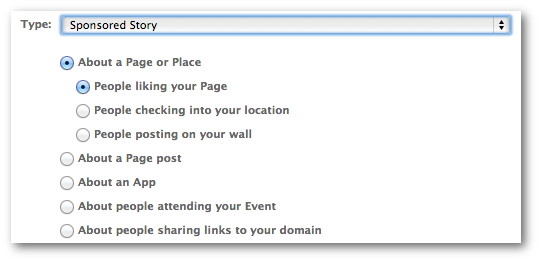
All of the options make it seem more complicated than it is. In a nutshell, a Sponsored Story is promoting the activity of Facebook users with your Facebook Page, app, post or event. Whenever someone likes, comments, shares or creates any other story, you can turn that into an ad so more people see it.
Ad Destinations
The destination of an ad is going to be the Facebook Page, app or event that you’re promoting.
URL Tags
I’m not going to dig into this one right now, but URL tags are used for tracking purposes. Feel free to ignore for now.
Conversion Tracking
Again, this is an advanced feature that I will do an entire lesson on. But Conversion Tracking allows you to track how many users clicked on or saw your ad and then later converted on your website.
Placement
One of my favorite things about Power Editor is having control over where your ad is displayed.
You can choose All Facebook, Desktop (Sidebar and News Feed) Only, News Feed (Desktop and Mobile) Only, Desktop News Feed Only and Mobile News Feed Only.
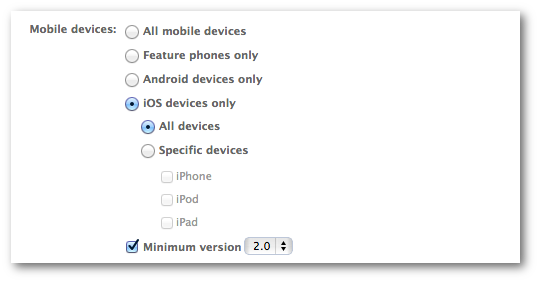
If you include mobile, you can even target specific devices. Pretty amazing!
Recap
What did you learn today?
1. How to Create an Ad
2. How to Name an Ad
3. Introduction to Ad Types, Destination, Conversion Tracking and Placement
Your Assignment
Action Items:
- Using your test campaign create a test ad!
- Name your ad using the convention I recommend to be very specific
- Think about what you want to promote and where — do something different!