If your business logs important conversion events that happen offline and you run Meta advertising, you should send those offline events using the Conversions API. These offline events can be used for attribution (provide credit to your ads for conversions) and optimization (show ads to people likely to perform that event).
The most common scenario is when you have reps who contact leads in an effort to close sales. If those sales aren’t represented by website conversions, you’ll want to send those to Meta so that they are eligible to appear in your Ads Manager reporting.
Of course, there are countless ways to do this. It’s the biggest issue when communicating how to set up the Conversions API (whether web or CRM). I’m writing this post so that it can apply to the most people possible, requiring Google Sheets and Zapier.
This is a multiple step process, because nothing with Meta can be straight-forward. But, I’m hoping to make it as painless as possible.
In order to follow the steps in this tutorial, you’ll need the following:
- A Google account (for Google Sheets)
- A Meta Business and ad account
- A Zapier account
1. Create an Offline Event Set
From your Business Settings (also known as Business Manager), go to Offline Event Sets under Data Sources.

Click the blue “Add” button. Then name your offline event set and click “Create.”

Select the ad account that you want to connect to the Offline Event Set and save or click “Next.” You can then give individual people access, if necessary.
2. Create an Initial Event Set
You haven’t provided any data yet, but we need to know what data we can provide and in what format. A good way to set this foundation is by creating an initial offline event set.
Go to Events Manager > Data Sources and find the Offline Event Set that you just created.
It won’t have any data in it yet, so click the blue “Upload Events” button.

It will look like this…

We’ll want to go through the steps of uploading a CSV file of offline customers. While you can rely entirely on the automation we set up to do this, manually uploading a couple of records is a good way to confirm that the format is correct.
You can click to view examples of the data and formats that Meta accepts. Hover over data types to get examples.

The easiest path forward may be to download an example CSV file. Meta provides a link to it, otherwise click here.
Delete any columns that you don’t use and fill in with some data — either some dummy data or a few of your customers. Make sure to use formats that Meta accepts.

Save the CSV. Then click the green “Select CSV File” button.

At the top right, click “Next: Map Data.”

Meta will attempt to map your columns to data they accept. Check to make sure they did so properly. If there’s a column that Meta doesn’t recognize, click it to help map it.

Then select what it should be.

If there’s anything Meta should ignore, select that option.

Then click the blue button at the top right for “Next: Review.”

Hopefully, you don’t have any issues. If you’d like to upload this initial data, click “Start Upload.”
3. Create a Google Sheet
Go to Google Sheets and create a new Sheet. Then paste the columns from the initial CSV. Make sure that you maintain the same format that you used in the original upload.
Do not add any new data to this Sheet until you’ve finished creating your Zap. You’ll then want to update this Sheet whenever you have a new offline customer event that you need to report. That can be done either manually or dynamically using a Zap or some other type of automation.
How you do that is up to you, but I won’t cover it here since there are limitless methods you could do that, depending on your CRM and setup. But you could potentially do it by creating another Zap with Zapier.
4. Create a Zap
Create a Zap where the Trigger event uses Google Sheets and the Action event uses Facebook Offline Conversions.

The “Event” that starts the Zap is “New or Updated Spreadsheet Row.”

Select your Google account. Then select the spreadsheet, specific worksheet, and trigger column. It could look something like this…

If you don’t see the spreadsheet that you created, first make sure that you’re logged into the correct account. Otherwise, click to refresh the data.
Test the trigger to make sure that it brings in data.
The action that you’ll want to perform is “Send Offline Event.”

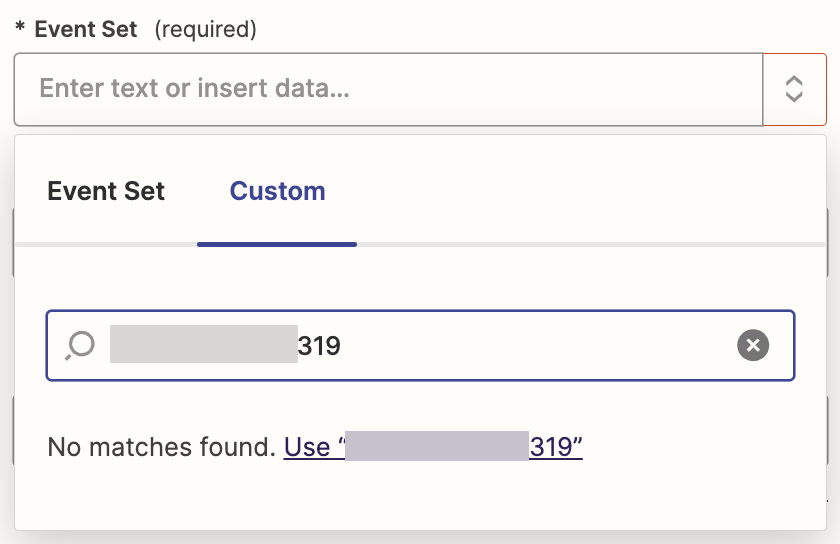
Select your business account. Then select the Event Set. If nothing appears, don’t panic. This is a known problem that has a workaround.

If you are unable to select your Offline Event Set, go back to Events Manager. At the far right of the Data Sources Overview tab, you should see an Event Set ID that is 15 numerical characters long. Copy that.
Back to Zapier. In the Event Set field, there should be an option to enter custom data. Move to that tab and paste the Event Set ID. It will likely say “No matches found” and a link to use that ID that you pasted. Click that.
Select each of the fields that will pull from your Sheet (examples below are dummy data).

If you don’t provide a date and time, it will default to the time of the Zap. If your sheet is updated in realtime, it’s likely fine to keep that blank.
When you’re done, click “Continue” and test the final step.
Is It Working?
Once your Sheet updates, you should begin to see data in Events Manager. Just know that the date of the data is determined by the date used in your Zap.

You won’t see this data immediately, so don’t panic. It may take 30 minutes or an hour once a Zap runs with new data.
Ads Manager Columns
You’ll want to make sure this new data is reflected in your reporting, where possible. Remember that this will only happen if an offline conversion can be attributed to your ad.
Within Ads manager, click the Columns dropdown and select Customize Columns.

Search for the event that is reflected by your offline activity. Let’s say that it’s a Purchase. When you add Purchases as a column, you can check a box for “Offline purchases.”

That new column will then appear in your reporting.
Optimization
If you want to optimize for an offline event, you can create a custom conversion for it. The easiest way to do this is from the Data Sources Overview screen when viewing your offline event set.
Click the green “Create” dropdown menu at the top right and select Custom Conversion.

The data source should be prefilled. Then select the Event. Finally, you’re required to create a rule for when these events should be included in the custom conversion. If you want it to include all, just create a rule that would automatically include them all — like a purchase value that is more than 0.

Watch Video
I also recorded a video walkthrough on this. You can watch it below…
Your Turn
Do you pass offline events using the Conversions API?
Let me know in the comments below!


