One of the problems newcomers have to Power Editor is that the seemingly limitless options result in paralysis. There is so much you can do, but where do you start?
Well, the first thing you need to understand is the types of ads you can create. The options fall into two categories:
- Standard Facebook Ads
- Sponsored Stories
Today we’re going to tackle the standard ad options.
Ready? Let’s go!
What You Are Going to Learn Today
Today’s lesson is Standard Facebook Ad Options. We’re going to focus on the following:
- How to Create an Ad for a Website
- How to Create an Ad for a Facebook Page
- How to Create an Ad for a Facebook Page using a Page Post
- How to Create an Ad for an App on Facebook
- How to Create an Ad for a Facebook Event
Lots of info for one lesson, but it’s actually relatively straight-forward.
The Lesson
I assume that you’ve completed Section 2 and know how to create a Facebook ad. If not, start there first.
After creating the name of your ad, you will get a drop-down for “Type.”
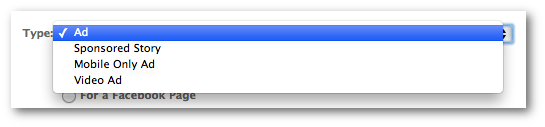
Leave it on “Ad.”
For a Website
Select “For a website” under tab and you’ll get options that look like this…
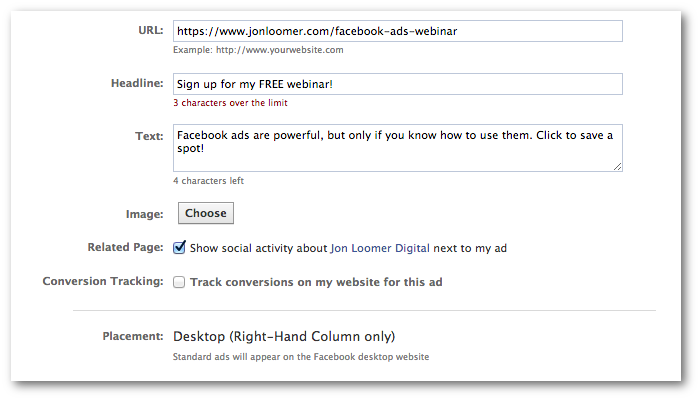
This is an ad that can be entirely independent of your Facebook Page. Your only goal is to send traffic to your website.
To create such an ad, you need to complete the following information…
URL: The exact address where your ad will direct people.
Headline: Catch a user’s attention in 25 characters or less.
Text: Your value proposition and call to action (“Click to learn more”) in 90 characters or less.
Image: Ideally, a high-quality image. Close-up of a face often works best. Max and ideal dimensions are 100×72 pixels.
You then have a couple of options…
Related Page: If Facebook can connect the domain you are sharing to a Facebook Page, you will be given an opportunity to show social activity next to your ad. This is a way to drive traffic and increase Likes at the same time.
Conversion Tracking: Optimize and track for an offsite conversion like purchases and registrations. We’ll get to that later!
Also note that such ads can only be displayed in the sidebar. Facebook does not provide options for the News Feed.
For a Facebook Page
This is one of the more common ad units you’ll see on Facebook. You’ll see it in the sidebar on News Feed, promoting a Facebook Page. Unlike the next option, this gives you the ability to customize copy to drive people to like your Page.

To create such an ad, you need to complete the following information…
Destination: Select your Facebook Page.
Landing View: By default, a user would be sent to your Timeline. But you can also choose to send them to a specific tab.
Headline: Catch a user’s attention in 25 characters or less.
Text: Your value proposition and call to action (“Click Like for X”) in 90 characters or less. This is where you can send someone to a Fan gated Facebook tab, offering up something of value in exchange for the Like.
Image: Ideally, a high-quality image. Close-up of a face often works best. Max and ideal dimensions are 100×72 pixels.
With this type of an ad, you have access to all placements. Just know that, but we’ll dig into that in a future lesson in this section.
For a Facebook Page Using a Page Post
This is also known as a Page Post Ad. When you target Fans only in the News Feed, you may also think of it as a Promoted Post or Boosted Post (or a much better way to create such an ad, as opposed to the Boost Post button). We’ll actually get to this in the next lesson.
This option is when you take a post that you already created (or an Unpublished Post) and turn it into an ad. “Turning it into an ad” simply means controlling who sees it. You can target your Fans or non-Fans with it.
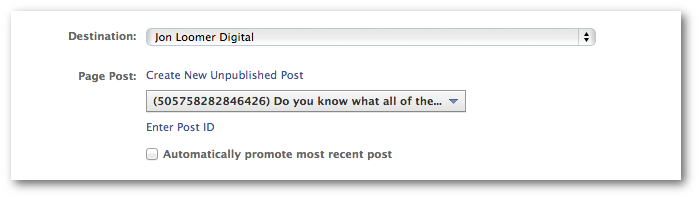
To create such an ad, you need to complete the following information…
Destination: Select your Facebook Page.
Page Post: Select the post that you want to promote. If your post is not in the drop-down, you can enter the post’s ID. This is the string of numbers at the end of an individual post. For example…
Do you know what all of the various Insights terms mean? Bookmark this!
Posted by Jon Loomer Digital on Tuesday, August 6, 2013
The post ID here is 505758282846426.
You can find a direct link to a post by clicking on the time stamp (see the video for an example).
You will have the option of automatically promoting your most recent post. This is up to you, but I would not recommend this. First, picking this removes the ability of a post to first spread organically. Second, I personally don’t believe that all posts are worthy of being promoted.
Again, this is a business decision. But in my opinion you should strategically promote posts and wait until they first have at least a few hours to spread organically.
Note that you do not have the option of providing a headline, text or image here. Remember that you are promoting a post that has already been created. Therefore, you have no ability to customize.
For an App on Facebook
If you’ve created a standalone app on Facebook (not a tab associated with your Page), this ad unit is a way to drive installs.
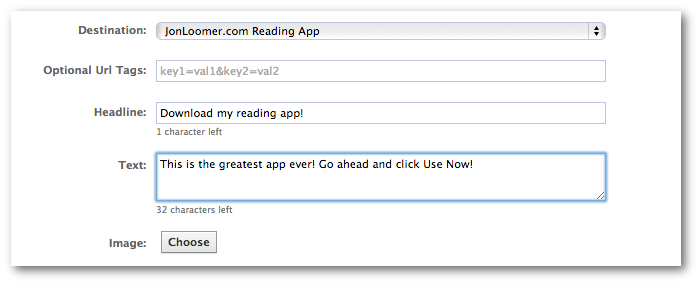
To create such an ad, you need to complete the following information…
Destination: Select the app that you want to promote.
Optional URL Tags: A string of characters that you can use to track installs (more on that later).
Headline: Catch a user’s attention in 25 characters or less.
Text: Your value proposition and call to action (“Click use now”) in 90 characters or less.
Image: Ideally, a high-quality image. Probably your app’s logo. Max and ideal dimensions are 100×72 pixels.
These ads only appear on the desktop.
For a Facebook Event
Want to increase attendance at your event? This is how you do it.
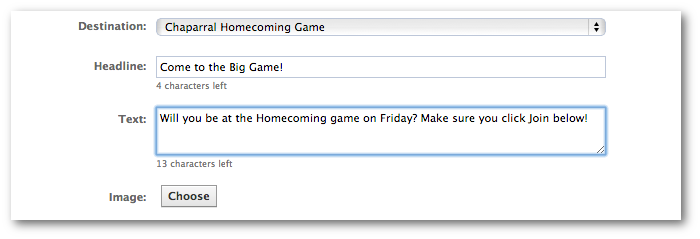
To create such an ad, you need to complete the following information…
Destination: Select the event that you want to promote.
Headline: Catch a user’s attention in 25 characters or less.
Text: Your value proposition and call to action (“Click Join now”) in 90 characters or less.
Image: Ideally, a high-quality image. Probably your event’s logo. Max and ideal dimensions are 100×72 pixels.
These ads only appear on the desktop.
Recap
What did you learn today?
Hopefully you learned how to create an ad for each of the following:
- A Website
- A Facebook Page
- A Page Post
- An App
- An Event
In the next lesson, we’ll dig into how to create a much better version of what is commonly called a “Promoted Post” or “Boosted Post.”
Your Assignment
Action Items:
Go through the steps outlined above to create your own test ad to promote the following:
- A Website
- A Facebook Page
- A Page Post
- An App
- An Event