


[NOTE: The following is a guide to the latest updates to Facebook Ads Manager. Go here for a guide to Facebook Power Editor updates.]
When I logged into my Facebook Ads Manager today, I was pleasantly surprised that I was greeted with the new design…


The new Facebook Ads Manager is rolling out to everyone, and it looks pretty slick. It’s simplified and — once you get a hang of it — actually makes more sense than the previous setup.
Let’s take a closer look…
[Tweet “The new Facebook Ads Manager is rolling out globally! Here’s everything you need to know…”]
Custom Ad Reports Front and Center
In the past, very few advertisers used the custom ad reports. The default view of Ads Manager was a very top-level performance analysis. To get the good stuff, you needed to click the “Reports” link on the left.
But now, there is no “Reports” link. Why? Because the entire Ads Manager is now the Custom Ad Reports!

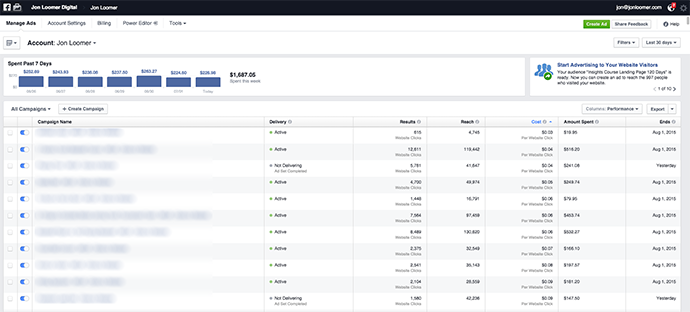
All of the old filtering and customizing that you could do with the old ad reports can be done within the main view. But there’s even more customizing buried within that we’ll get to later!
Top Nav
The new top navigation looks like this…

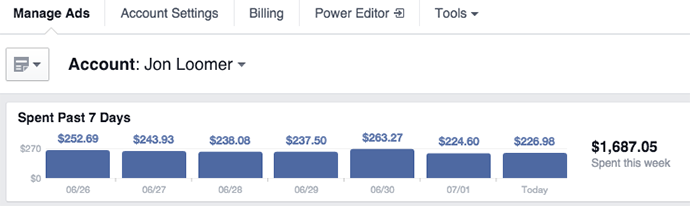
It includes a nice little graph showing what you’ve spent each of the past seven days as well as links to the following:
- Manage Ads (Default)
- Account Settings
- Billing
- Power Editor
- Tools
These are all links that existed before, just in a new location.
Tools Dropdown

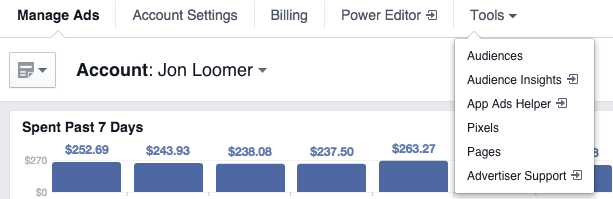
The “Tools” dropdown in the top nav includes the following:
- Audiences
- Audience Insights
- App Ads Helper
- Pixels
- Pages
- Advertiser Support
Much of this previously lived on the left hand column in a list of links. “Pixels” is very new — I saw it within the past week — and “App Ads Helper” is also something I haven’t seen before.
Pixels

If you select “Pixels,” you’ll get reports and graphs on the performance of your Website Custom Audience pixel by default. You can view activity by domain (default), URLs, device or events. To get event data, you’ll need to be using the new WCA pixels.
By default, you’re viewing Custom Audience Pixel performance. If you select Conversion Tracking Pixel, you’ll be redirected to the old Conversion Pixels page.

If you click the “Actions” dropdown at the top, you can select from the following:
- Edit Pixel
- View Pixel Code
- Email Pixel Code
- Share Pixel
You can share the pixel with another ad account, and that would be done through Business Manager. Here’s a really quick look at that process…

You would click either “Assign Ad Accounts” or “Assign Agency.”
All Campaigns Dropdown
By default within the main “Manage Ads” view of Ads Manager, you’ll see a report broken down by campaign. At the left you’ll see an “All Campaigns” dropdown…

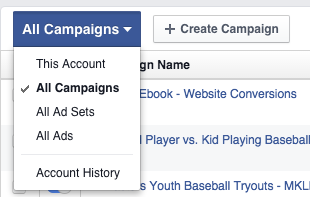
You have the option to view results by…
- This Account
- All Campaigns
- All Ad Sets
- All Ads
By selecting “Account Activity,” you’ll get a report of all activity on your ad account — including things like ad approvals, ad rejections, ad creation, etc.
Filters

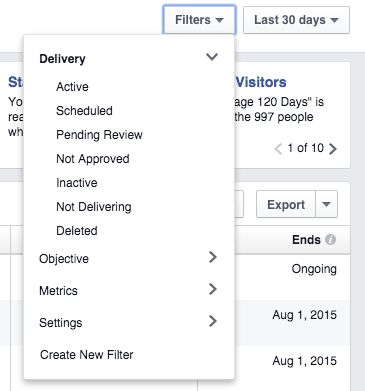
At the top right is a “Filters” dropdown. This is useful!
By default, nothing is filtered. But you can filter by any of the following information…
Delivery:
- Active
- Scheduled
- Pending Review
- Not Approved
- Inactive
- Not Delivering
- Deleted
It will definitely be useful to focus only on what’s active, for example. I also don’t believe you could previously view deleted campaigns.
Objective:
- Page Post Engagement
- Page Likes
- Clicks to Website
- Website Conversions
- App Installs
- App Engagement
- Local Awareness
- Event Responses
- Offer Claims
- Video Views
This is awesome! In the past, I’ve always put the objective in the name of the campaign so that I could then create a manual filter to focus only on certain objectives. Now it’s built in!
Metrics:
- Cost Per Result
- Lifetime Spent
- CPA
- CPM
- Frequency
- Impressions
- Reach
- Results
This is also new!

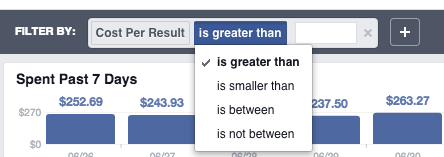
For each of these, you can manually enter an amount to filter out for the following:
- is greater than
- is smaller than
- is between
- is not between
Settings:
- Campaign Name
You can also create a new filter, similarly to how this was done before within the custom ad reports.
Dates

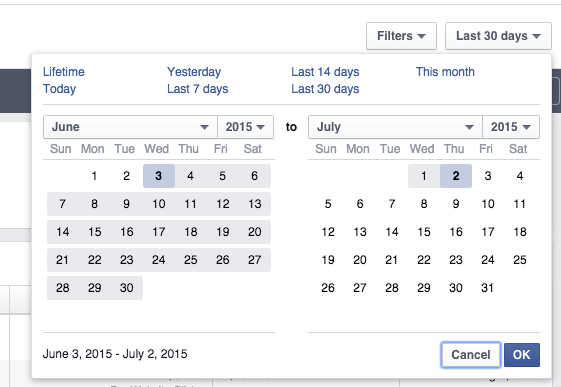
By default you will be viewing results during the past 30 days. But you’ll have the following options at the top right:
- Lifetime
- Today
- Yesterday
- Last 7 Days
- Last 14 Days
- Last 30 Days
- This Month
- Custom (choose start and end dates)
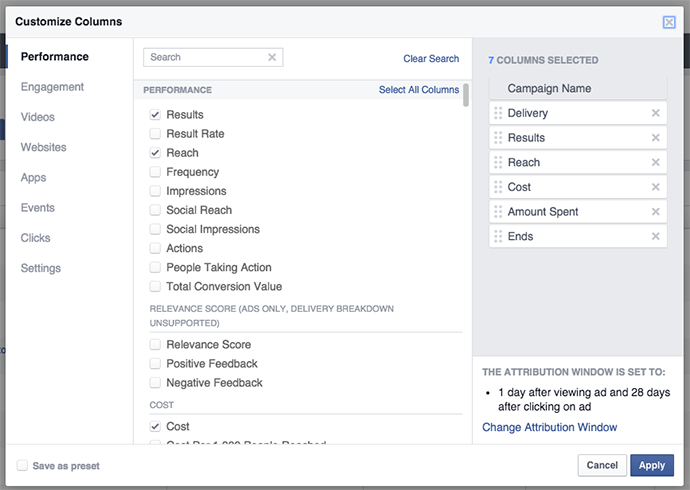
Columns

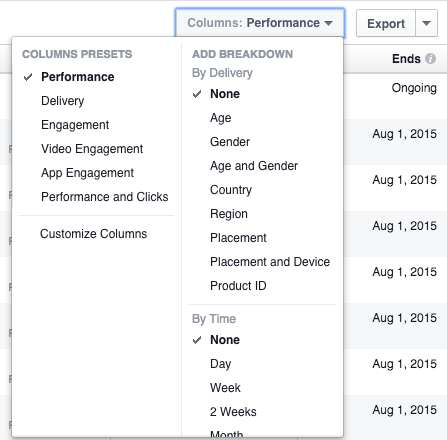
At the far right is a dropdown for “Columns.” This has many of the customizable options found in the prior Custom Ad Reports, but with a little bit more!
Column Presets:
- Performance
- Delivery
- Engagement
- Video Engagement
- App Engagement
- Performance and Clicks
The “Performance” preset is selected by default, focusing only on the columns related to performance — mainly your objective.
If you don’t want to use a preset, you can also click “Customize Columns” to customize which columns you see, just like you did previously with the old Custom Ad Reports.

ADD BREAKDOWN (By Delivery):
- None (Default)
- Age
- Gender
- Age and Gender
- Country
- Region
- Placement
- Placement and Device
- Product ID
This is all the hugely valuable information that was previously found within the “Breakdown” dropdown in the Custom Ad Reports. From one ad set, you could have Facebook break down performance by any of these categories. It’s great!
ADD BREAKDOWN (By Time):
- None (Default)
- Day
- Week
- 2 Weeks
- Month
View rows of performance broken down by time period. Otherwise, you’ll get one row per campaign, ad set or ad for the entire period.
ADD BREAKDOWN (By Action):
- None (Default)
- Conversion Device
- Destination
- Video View Type
- Carousel Card
Again, most of this was available within the old “Breakdowns” dropdown, though I believe “Carousel Card” is new.
Campaign, Ad Set or Ad: Performance

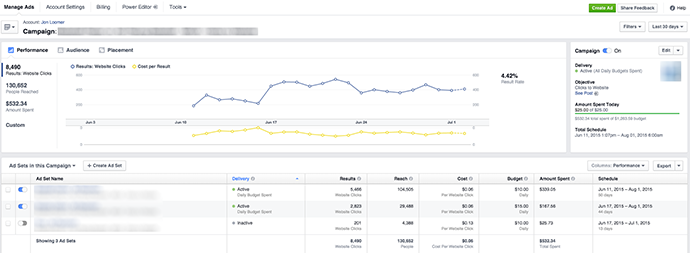
If you were to click on a campaign, ad set or ad, you’d get a similar view. By default, you’ll get a breakdown of performance, like above.
Performance focuses on Results (objective based) and Cost Per Result. There’s a nice little graph for this, too.
Under Performance, you can also view “People Reached.”

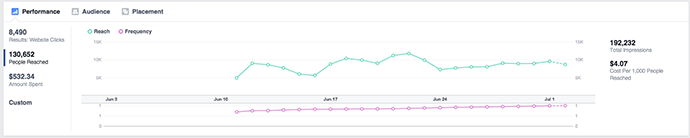
This breaks down Reach and Frequency over time.
Under “People Reached” is “Amount Spent.”


This allows you to see what you’ve spent for a given campaign, ad set or ad over time.
Under “Amount Spent” is “Custom.” Click that and you’ll have two dropdowns, by default for Actions and Impressions.

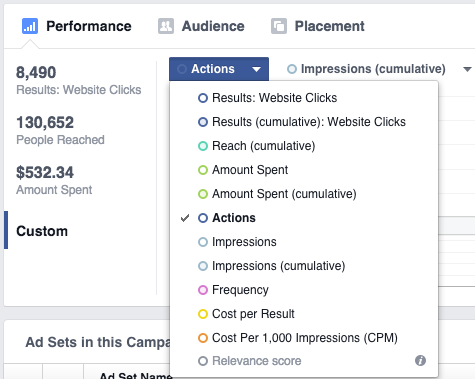
Both dropdowns contain the same options, allowing you to compare two different stats. The actions available will depend upon objective, but this is what you can choose from when the objective is Clicks to Website:
- Results: Website Clicks
- Results (cumulative): Website Clicks
- Reach (cumulative)
- Amount Spent
- Amount Spent (cumulative)
- Actions
- Impressions
- Impressions (cumulative)
- Frequency
- Cost Per Result
- Cost Per 1,000 Impressions
- Relevance Score
Campaign, Ad Set or Ad: Audience

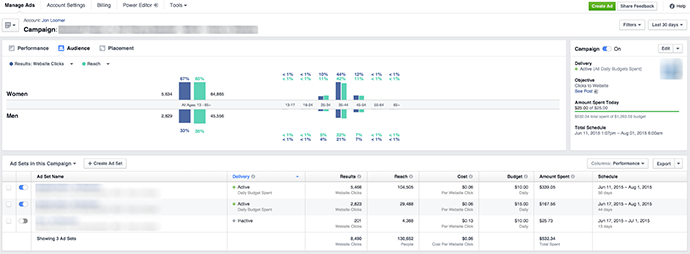
As mentioned, the default view of a campaign, ad set or ad is a breakdown of Performance. But you can also select Audience. Here you’ll get a breakdown of several metrics by age and gender — including a nice bar graph.


By default you’ll see a breakdown of results for your objective and reach by audience, but there are two dropdowns which each contain these options:
- Results: Website Clicks (in the image above)
- Amount Spent
- Reach
- Impressions
Campaign, Ad Set or Ad: Placement
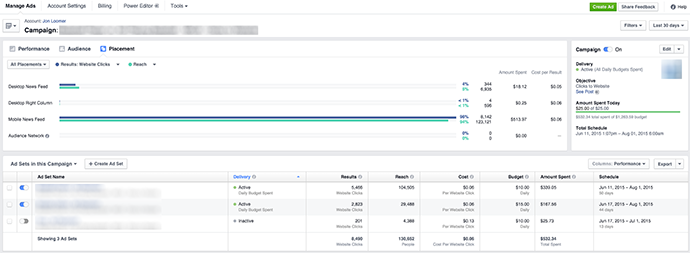
In addition to Performance and Audience, you can also view a breakdown by Placement.
In this case, Facebook will break down this same information by placement:
- Results: Website Clicks (based on objective)
- Amount Spent
- Reach
- Impressions
Placements include:
- Desktop News Feed
- Desktop Right Column
- Mobile News Feed
- Audience Network
You can also choose from either All Placements or Mobile Breakdown. If Mobile Breakdown is selected, you’ll see distribution by device.
Your Turn
What do you think of the new Facebook Ads Manager?
Let me know in the comments below!