Attribution is the process of giving credit to an ad for a conversion. It’s the foundation for the ultimate determinant of performance. As a result, you must understand the Meta ads Attribution SettingAttribution is how Meta gives credit to an ad for a conversion. Your Attribution Setting determines how your ad will be delivered and the reporting attribution window. The default Attribution Setting is 7-day click and 1-day view, which means that anyone who converts within 7 days of clicking or 1 day of viewing your ad will be counted as a conversion. More.
It’s not nearly as straight-forward as many expect it to be. Not only is it variable (you can change how attribution is defined), it controls more than just reporting.
If you’re confused, don’t worry. By the end of this post, it will all make sense…
ConversionsA conversion is counted whenever a website visitor performs an action that fires a standard event, custom event, or custom conversion. Examples of conversions include purchases, leads, content views, add to cart, and registrations. More
Attribution will only matter if you’re optimizing for any type of conversion that happens away from Facebook. Typically, this might be for a purchase or lead, but it can be for any conversion defined with a standard event, custom event, or custom conversion.
Usually, these conversions happen on a website. Someone visits a product landing page (View Content), adds a product to their cart (Add to Cart), begins entering their payment information (Initiate Checkout), and completes the purchase (Purchase). Or maybe they registered for your newsletter (Complete Registration) or provided contact details to learn more about your product (Lead).
The Attribution Setting does not apply to actions that occur within the Meta family of apps (clicks, Messenger conversations, Instant Form completions, comments, on-Facebook video views, and more).
CampaignThe campaign is the foundation of your Facebook ad. This is where you'll set an advertising objective, which defines what you want your ad to achieve. More Objective
Since a website conversion needs to occur in order for the Attribution Setting to apply, there are only certain campaign objectivesWhen you create a campaign, one of the first things you'll do is select an objective. The campaign objective is your ultimate goal. Your selection will impact options, including optimization and delivery. Options include Awareness, Traffic, Engagement, Leads, App Promotion, and Sales. More that will make this possible.
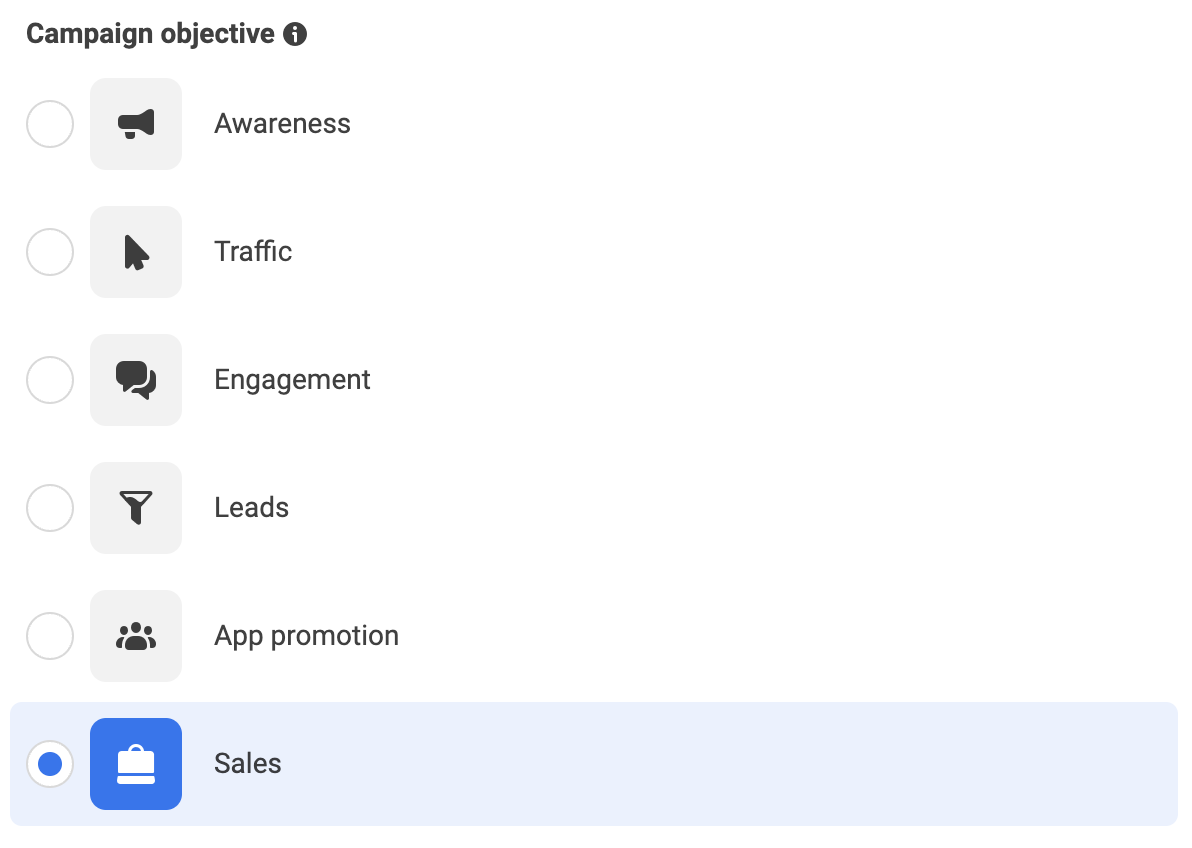
Only the following three objectives can lead to a website conversion:
- Engagement
- Leads
- Sales
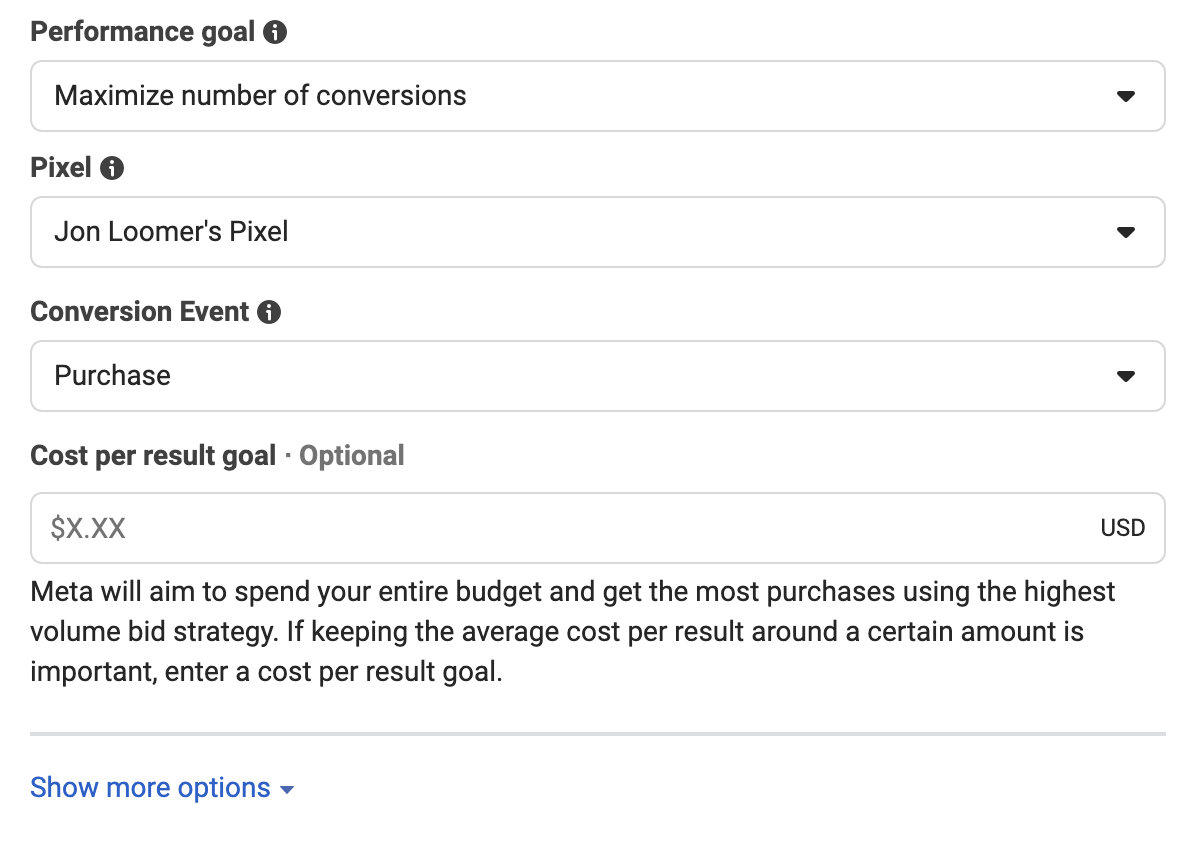
When using the Engagement objective, you would need to select Website as your conversion location, then “Maximum number of conversions” as your performance goalThe Performance Goal is chosen within the ad set and determines optimization and delivery. How you optimize impacts who sees your ad. Meta will show your ad to people most likely to perform your desired action. More.
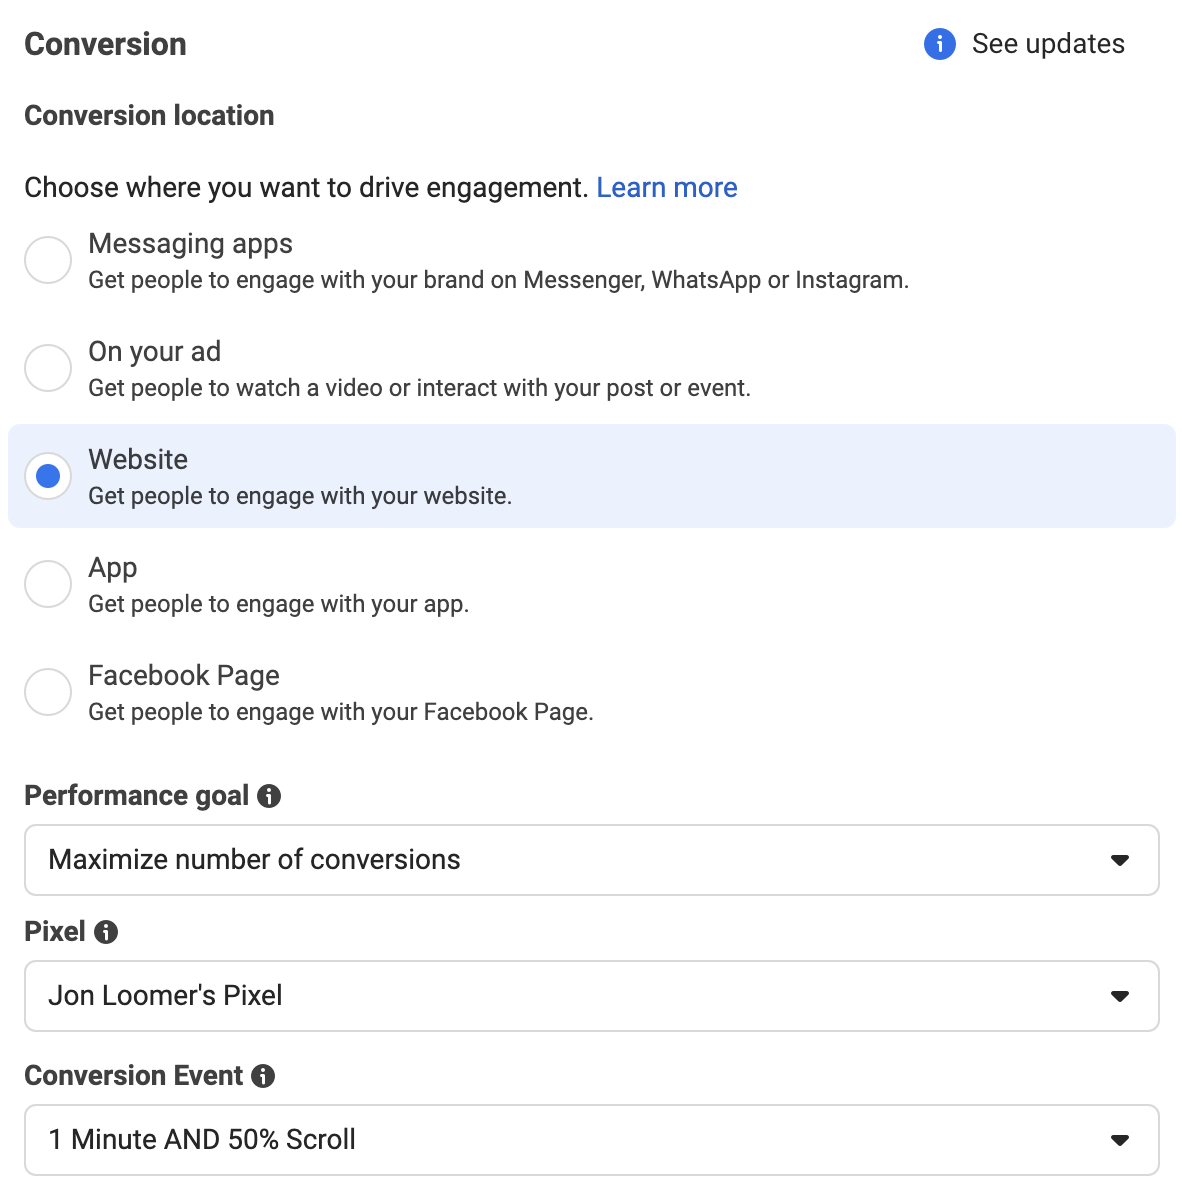
The Leads objective applies as well, but only if you select Website as your conversion location and, again, conversions as your goal.

Not surprisingly, the Attribution Setting applies to the Sales objective, but only when Website is your conversion location.
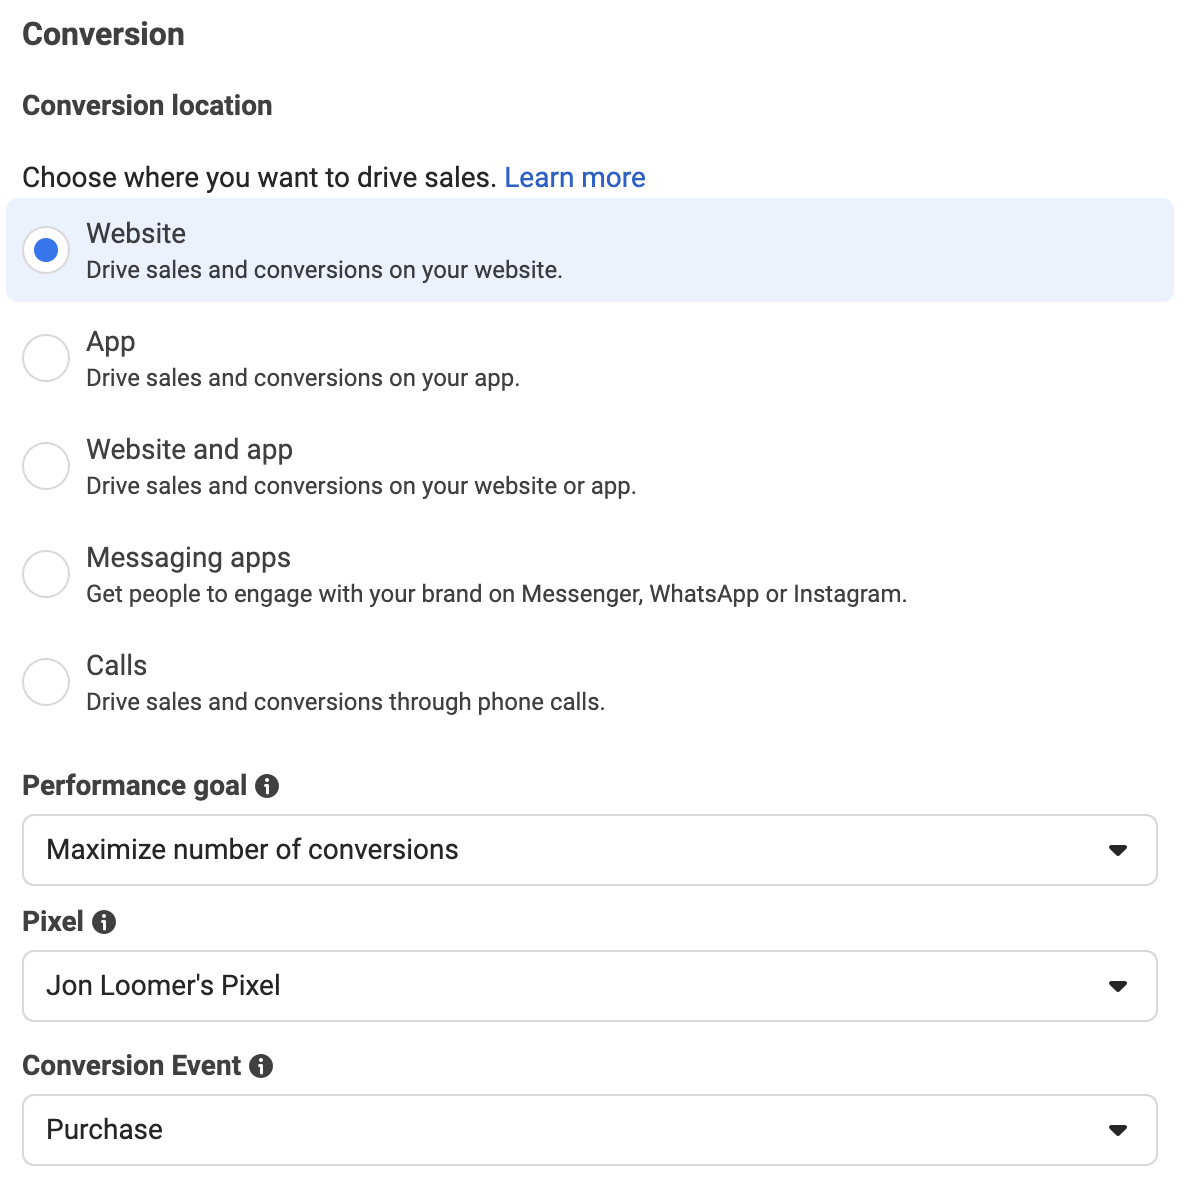
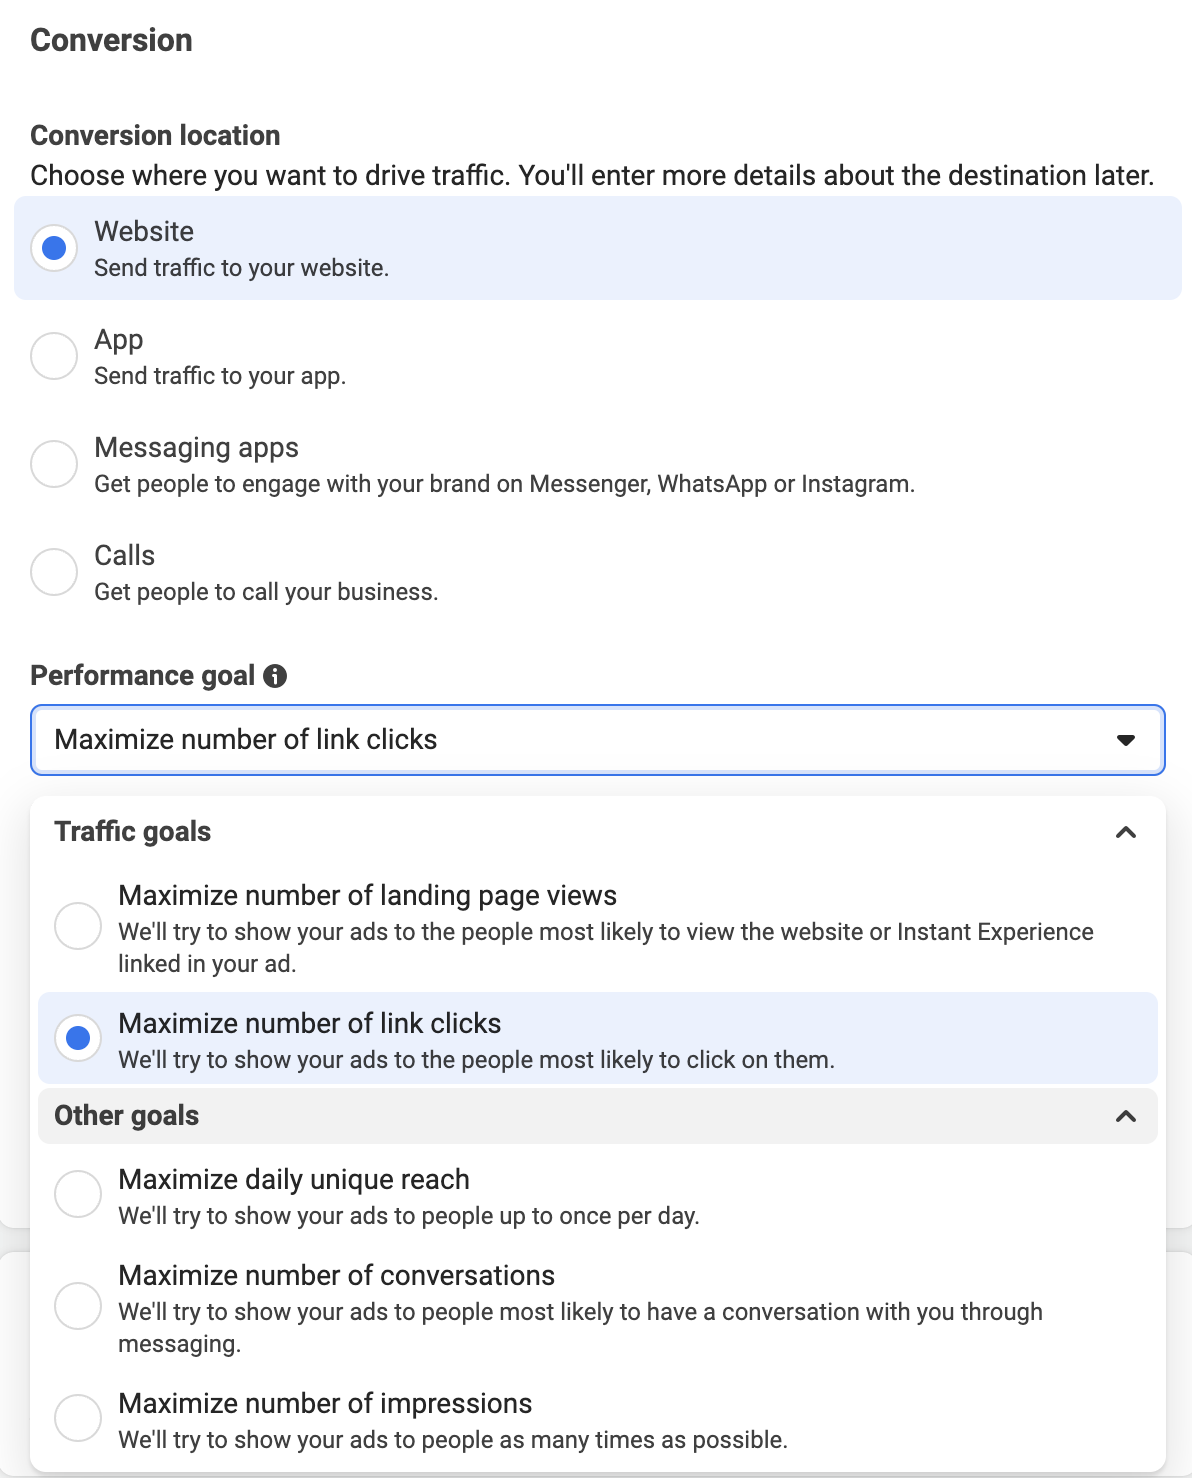
You may expect that the Attribution Setting would apply to the Traffic objective, but it doesn’t since you aren’t able to set a standard event, custom event, or custom conversionCustom conversions let you create rules for events or URLs so that you can better track and optimize for specific actions with Facebook ads. More as your performance goal.
Ad SetAn ad set is a Facebook ads grouping where settings like targeting, scheduling, optimization, and placement are determined. More Optimization
Now we have that out of the way, click the See More Options link beneath your performance goal.
You will now see the Attribution Setting…
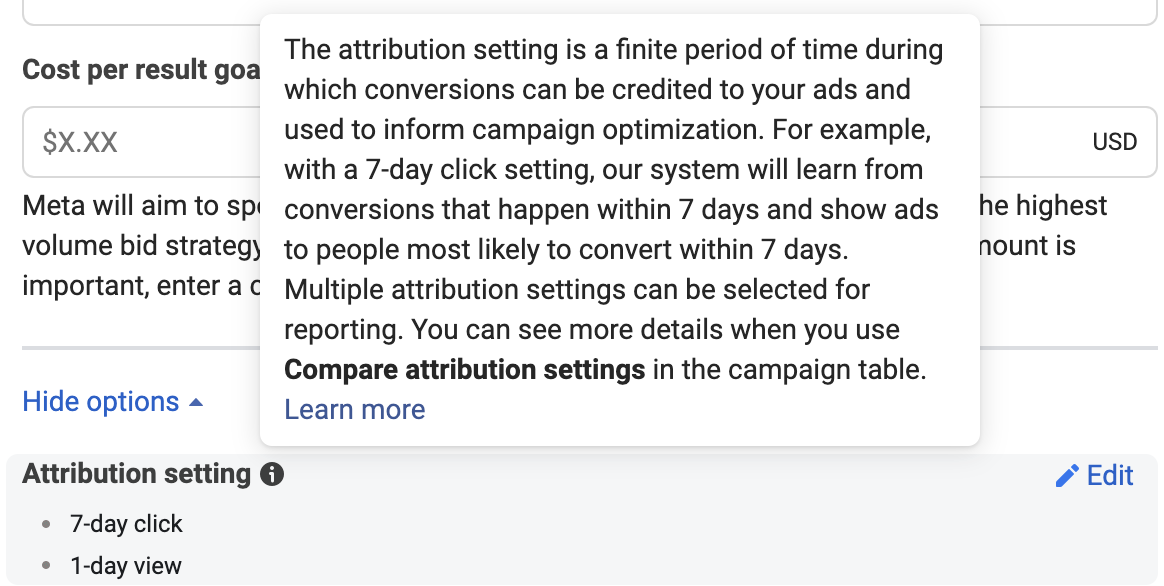
The default setting, as you can see above, is 7-day click and 1-day view. The first thing to understand is that this setting defines a conversion as one that happens within seven days of clicking on your ad or one day of viewing (and not clicking).
Meta knows who is served your ad. Meta knows who clicks it. Because of the Meta pixel, events, and Conversions APIConversions API provides a direct connection between your conversion results and Meta to be used for ad set optimization and reporting. Examples include both web and offline events. By using a Conversions API, you can send Meta a more complete picture of conversion activity to help improve your results. More, Meta also knows (mostly) who ultimately converted.
The default Attribution Setting of 7-day click and 1-day view means two things:
- Meta will optimize to get you the most conversions within 7 days of clicking and 1-days of viewing as possible
- Your results will be reported if they happened within this window
Edit the Attribution Setting
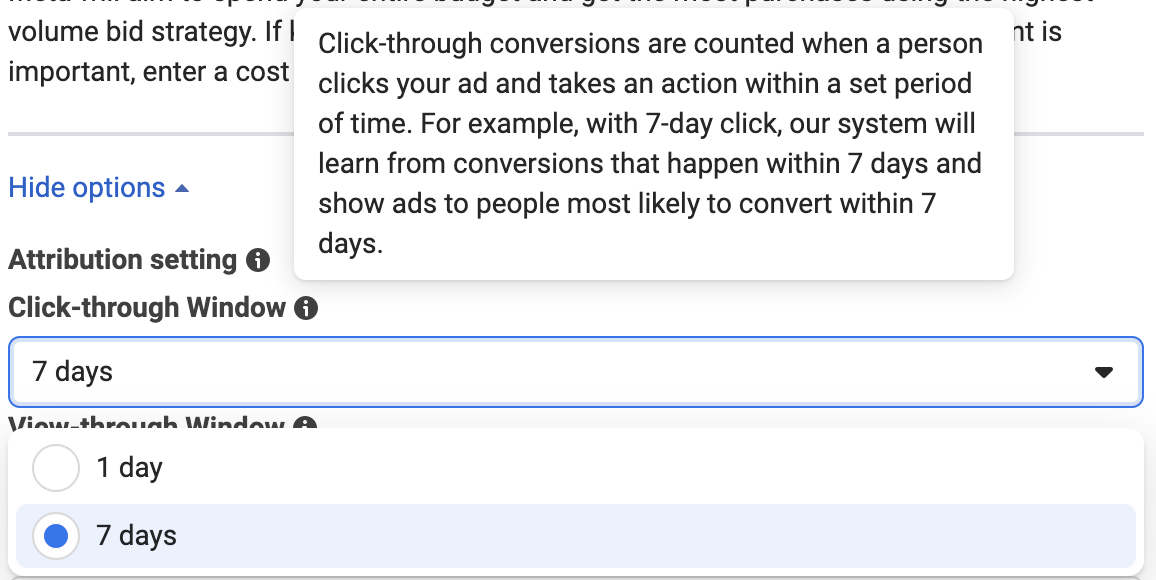
If you click the Edit link, you can also change the Attribution Setting…
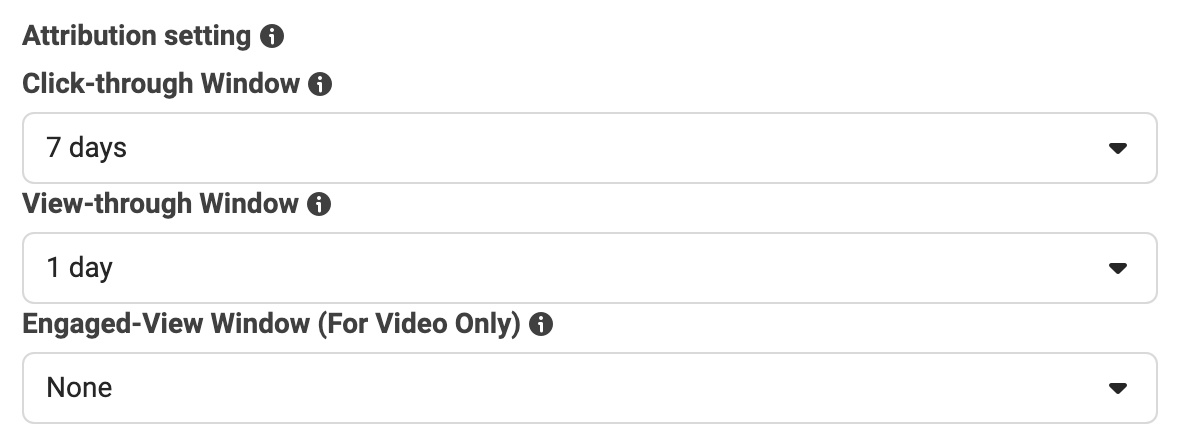
As you can see in the image above, you have the following windows that can be adjusted:
- Click-Through Window
- View-Through Window
- Engaged-View Window (For Video Only)
Each window can be adjusted individually.
Click-Through offers the options of 1-day or 7-days.
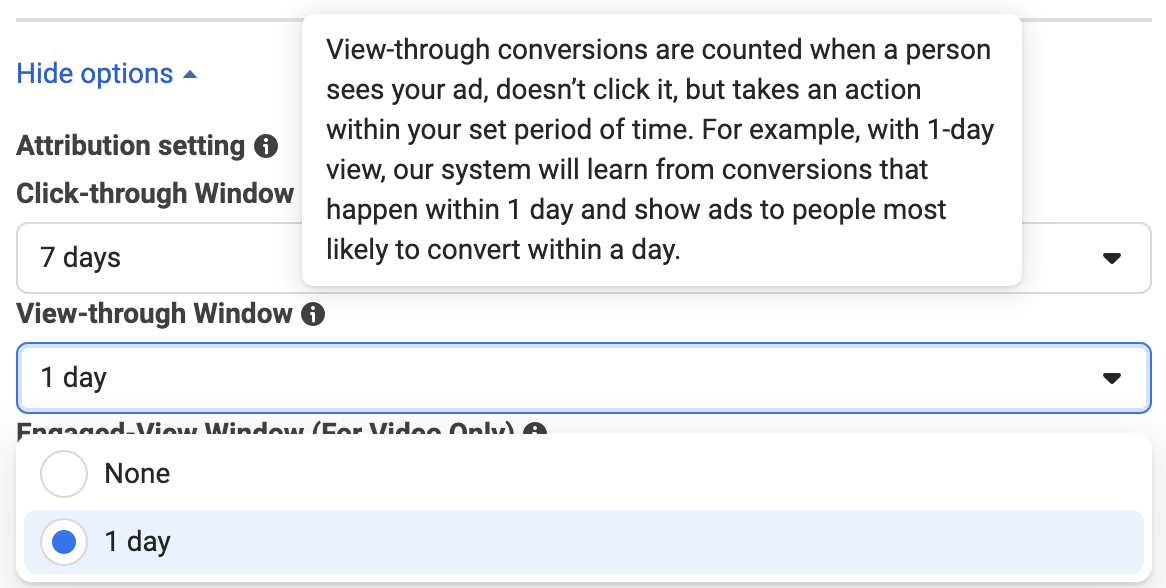
View-Through offers 1-day or none.
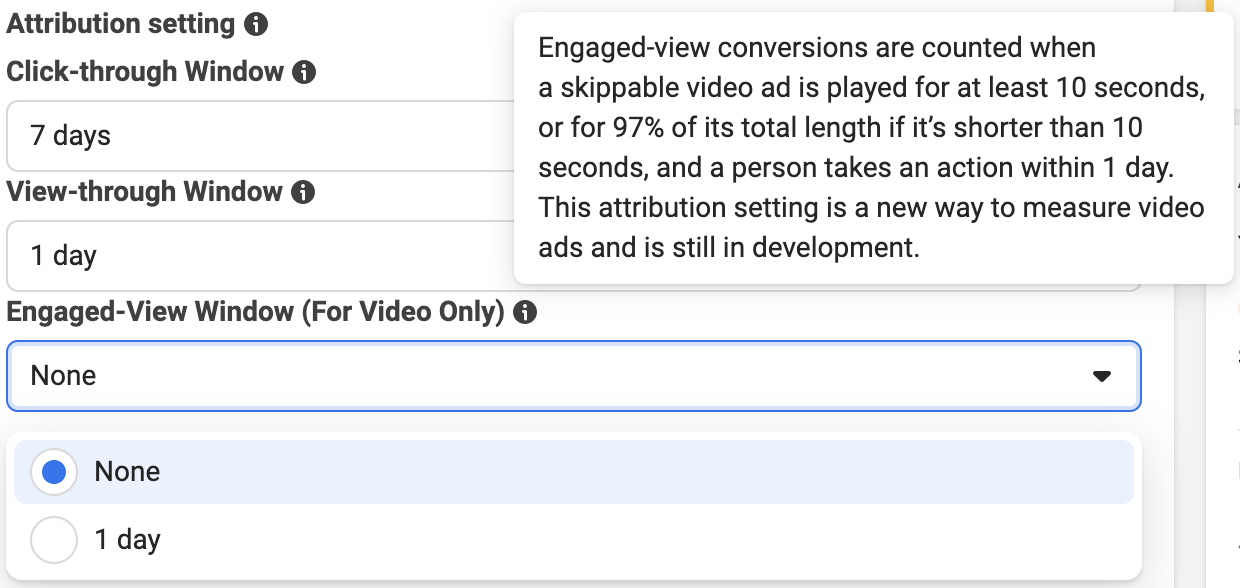
And Engaged-View offers 1-day or none. But note that you can only select 1-day for Engaged View if View-Through is also set to 1-day.
Remember: This will change both how your ad set is optimized for delivery (who will see your ad within your designated audienceThis is the group of people who can potentially see your ads. You help influence this by adjusting age, gender, location, detailed targeting (interests and behaviors), custom audiences, and more. More) and how conversions are reported.
I get that the inclination will be to stick with 7-day click and 1-day view. In theory, that should result in more conversions reported than the other options. But, there are reasons to consider the other options.
If the action you’re optimizing for often happens quickly because it’s free or may be an event defined by a type of website engagement, 1-day click may make sense. This will also prevent you from getting inflated numbers if people return to make take that action multiple times (particularly related to the engagement action).
If the action is a purchase, 7-day click and 1-day view will usually make the most sense. It may take time to make this decision. And the ad may inspire a search that leads to a conversion, even if they never clicked your ad.
You may also consider eliminating the 1-day view if you feel it will unnaturally inflate your results. This can especially be the case if you’re remarketing to people who get your emails or who already visit your website.
And finally, consider including 1-Day Engaged-View whenever promoting a video with a CTAA call-to-action is a button or link on your ad that suggests the action you want your audience to take. Examples: "Learn More" or "Sign Up." More button to a product page. This will help isolate people who watch at least 10 seconds of your skippable video before converting within a day (without clicking).
Base Reporting
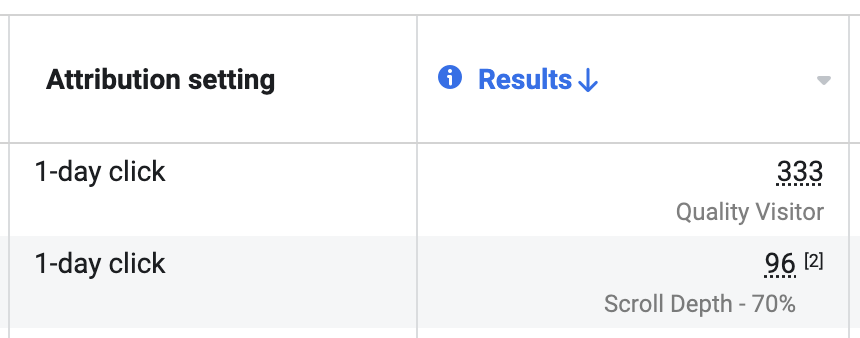
It’s critical to remember that the Attribution Setting you use determines how results are reported. There will typically be a column next to Results to remind you what Attribution Setting was used.
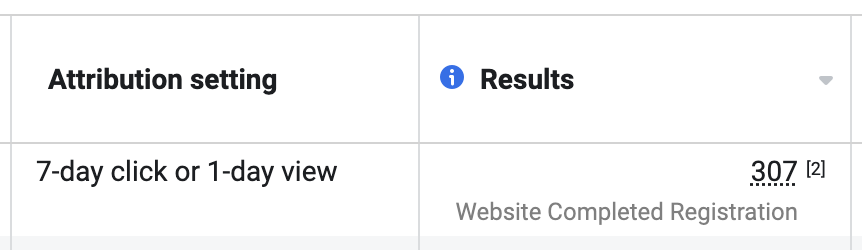
Here’s an example where the Attribution Setting was 1-day click…
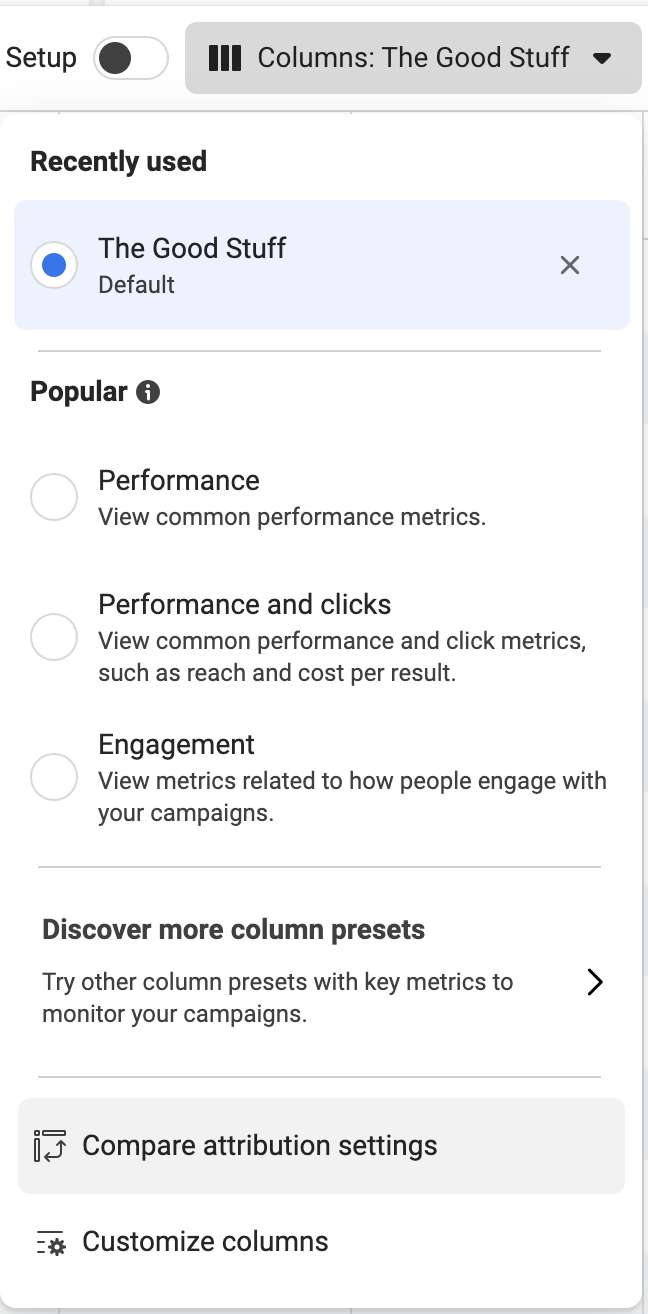
Compare Attribution SettingsCompare Attribution Settings is a feature within Ads Manager reporting that allows you to view how many conversions happened within each attribution window, regardless of the Attribution Setting used for optimization. For example, columns can be added to your report for 28-day click, 7-day click, 1-day click, and 1-day view to see how conversions are distributed across them. More
I understand why it may be difficult to go with a 1-day click AttributionClick Attribution is one way Meta gives credit to an ad for a conversion. Credit will be given to an ad when someone clicks your ad within a specified number of days of clicking. Click Attribution options include 1-day click, 7-day click, and 28-day click, the last being only available for reporting. More Setting and trust that it will give you better results than sticking with 7-day click and 1-day view. Luckily, you can always see how many conversions happened within the other windows.
Of course, many advertisers don’t know this exists. It was even originally taken away due to iOS changes (and then returned).
Click the Columns dropdown menu in Ads Manager and select Compare Attribution Settings.
Here’s the beautiful part: Not only can you select from 1-day click, 7-day click, 1-day view, and 1-day engaged-view, but you can add a column for 28-day click.
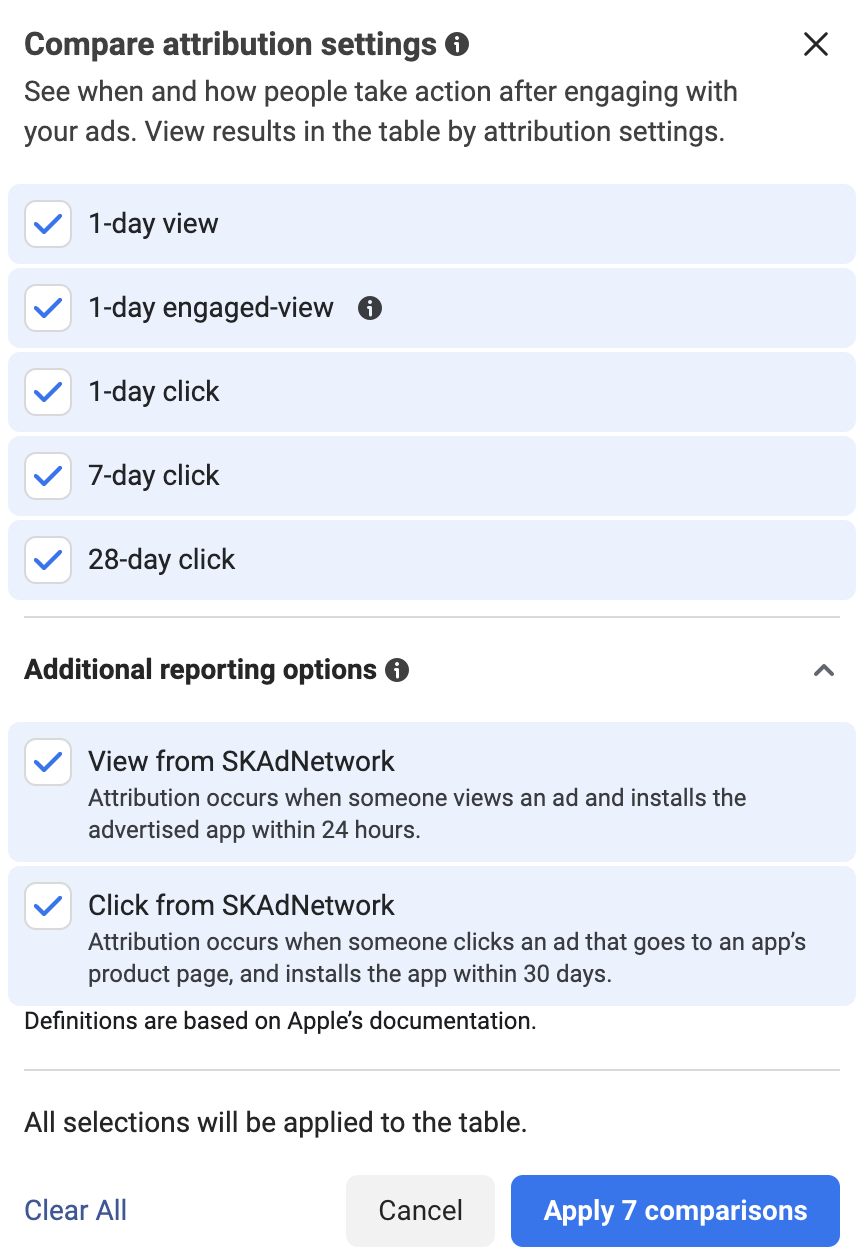
At the bottom, you also have options to add columns for click or view related to conversions that happen within your app (if you don’t promote an app and track app conversions, don’t worry about this).
You can then see how your conversions are reported across different windows.
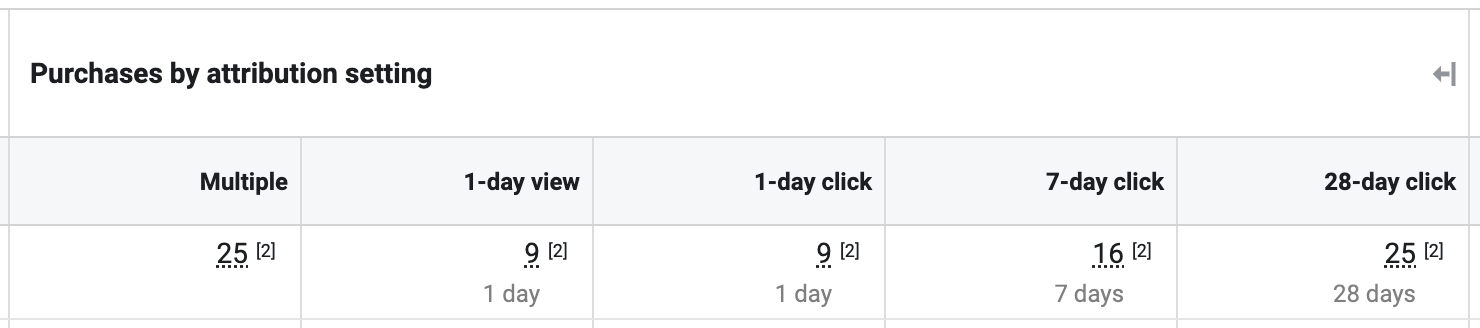
Keep in mind that the “Multiple” column is for whatever your Attribution Setting is. So, if you used 7-day click and 1-day view like I did here, the Multiple (25) column equals the addition of 7-day click (16) and 1-day view (9).
First, this can help inform the Attribution Setting you should use in the future.
Second, if we used 7-day click and 1-day view, it helps us see how many of those reported conversions happened within 1-day view. This is especially helpful if it feels like the numbers are inflated or they don’t add up with other analytics. You won’t get Google Analytics to verify view-through conversions from Facebook, for example.
But, the best part is that we just uncovered 9 more conversions that happened outside of 7-day click. We don’t even talk about 28-day click anymore, but it was once the default click-through attribution setting. Seeing these extra conversions can provide a completely different perspective of the performance of your ads.
Watch Video
I recorded a video about this, too. Check it out below…
Your Turn
I hope this gives you a much better understanding of the Attribution Setting and how you can benefit from it. How do you use it?
Let me know in the comments below!